In This Article
Overview
This article provides guidance for deploying the Worry Free agent on Windows computers. Due to the numerous ways of deploying the agent in a corporate environment (deployment scripts, endpoint management software, group policy, manual installs), this is not a step-by-step how-to article. Instead, this is general guidance for deploying the agent, which can be applied to your own situation.
TIP
For detailed information on the latest version of the Worry Free Business Security Services agent, check the Trend Micro's Worry Free Online Help, expand the row for the latest version, and click the link for Security Agent Help. For full details on the installation requirements, browse to About > System Requirements.
Windows Agent Requirements
The following requirements must be met before installing the agent:
- The endpoint has network connectivity to the Trend Micro Worry Free SaaS environment via the Internet.
- The user account used to install the agent is a local administrator.
- The remote computer is running a supported Windows operating system:
- Windows 10/11, fully patched. Windows 7/8 is not supported.
- Windows Server 2012 or newer, fully patched. Windows Server 2022 is supported.
Deployment Options
There are 2 ways to deploy the Windows agent:
- Send Installer Link - Send a user an email that includes a link to download and install the agent.
- Download Installer - Download the agent installer and use a deployment script or a management server to deploy the agent.

TIP
For step-by-step instructions on manually installing the agent, check the Trend Micro Worry Free Agent Installation page. The page contains instructions for installing the agent on all supported operating systems.
Considerations for Deploying the Windows Agent
Whichever method you use to deploy the agent, you should consider a few things:
- Reboot the endpoint before & after the agent installation. If Windows Defender is running, the agent installer will disable the service, which takes effect after a reboot.
- Trend claims that the agent installer will remove other antivirus software packages. You should test this before rolling out to production.
- If your endpoints are currently running Trend's Deep Security agent, it will need to be uninstalled before installing the Worry Free agent. You should reboot the endpoint in between the uninstall of Deep Security and the install of Worry Free.
- When using the Send Installer Link method, we recommend that you copy the link generated in the management console and paste it into an email customized for your organization.
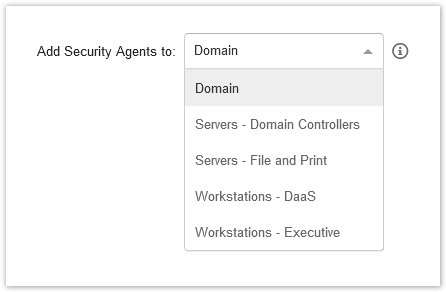
- Use the Add Security Agent to drop-down menu (see below screenshot) to define where the endpoint should be added within the management tree.
- If AD synchronization has been configured, choose Domain from the drop-down menu.
- If you are using manual groups, choose one of the groups from the drop-down menu.
- When you download the installer, give it a name that defines where the endpoint will be added within the management tree. Here are some examples:
- WFBS-SVC_Agent_Installer-Domain.msi
- WFBS-SVC_Agent_Installer-<ManualGroupName>.msi
Windows Agent Updates
By default, the Trend Micro ActiveUpdate service in the agent checks for updates hourly.
The ActiveUpdate service provides the latest downloads of virus pattern files, scan engines, and program files through the Internet. ActiveUpdate does not interrupt network services or require you to restart endpoints.
Additionally, the ActiveUpdate service supports incremental updates of pattern files. Rather than downloading the entire pattern file each time, the ActiveUpdate service can download only the portion of the file that is new, and append it to the existing pattern file. This efficient update method can substantially reduce bandwidth needed to update your antivirus software.
For detailed information about the agent update processes and the components that get updated, check the online help under the Security Agent Management section.