Agent Management via Bulk Upload
Agent management via bulk upload allows for the creation and modification of one or multiple agents including skills, passwords, load allowance and agent characteristics within the staffing tab of the Setup Client. The bulk upload also allows for the creation and assignment of new skills without needing to first add them to skilling tab under the Implementation subsystem or within an agent profile.
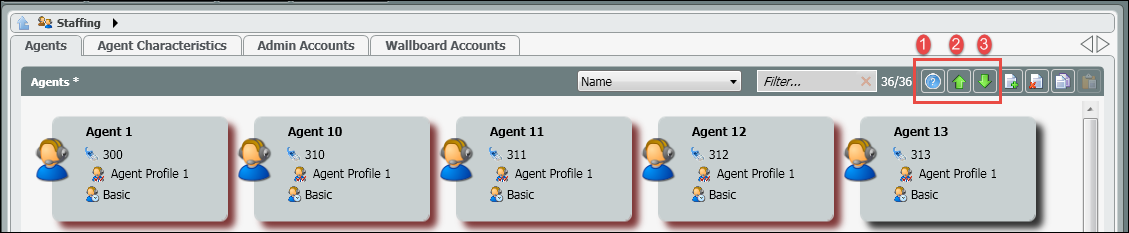
- Upload Help Content – provides a brief description of the export/import functionality
- Export File – export the selected agents and save as a .csv file
- Import File – import a saved .csv file to add or modify agents
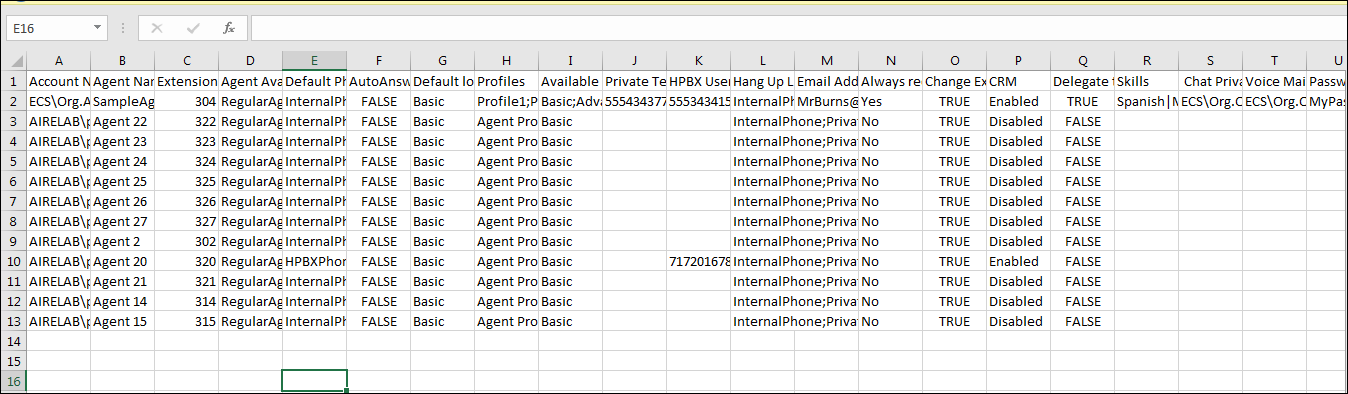
When exporting a file it will automatically create a .csv file with the first line of the file as the header and the second line as an agent sample. The header and sample lines cannot be edited. For an example of the exported file click here.
The following fields are included on the exported file:
- Account Name – Mandatory Field: example: ECS\plab.LizFox
- Agent Name – Name of existing or new agent. Mandatory Field
- Extension – extension assigned or to be assigned to a new agent. Not a mandatory field to import the file, but an extension will need to be provided to the agent before deploying any changes.
- Agent Availability Type – Regular Agent will always be the availability type and can be copied and pasted next to all new and existing agents.
- Default Phone – the default phone type will depend on whether your solution is Unified or Overlay. If Overlay InternalPhone should be used and if Unified HPBXPhone
- Auto Answer Interaction Media Types – Set the media type which will utilize auto answer. Telephony, Email, Chat, Fax, SMS.
- Auto Answer Telephony Interaction Delay – Set the auto answer delay for Telephony interactions.
- Default Load Allowance – will show the current default load allowance being utilized by the agent when handling interactions. However, if other load allowances have been created and assigned to the agent, a different default load allowance can be assigned to the agent or newly created agent.
- Profiles – Agent Skill Profiles are created and generally assigned to agents in the Agent Characteristics tab. Each profile is made up of a set of skills and level of proficiency that is assigned to each agent. Agents can be assigned to more than one profile. When assigning multiple profiles to an agent, the file entry should look like the following example: Profile1;Profile2. Each profile should be separated by a (;) with no spaces in between. Profiles are not Mandatory. Agents can be assigned individual skills under the ‘Skill’ column within the .csv file
- Available Load Allowances – an agent can be assigned to one or multiple load allowances. When assigning multiple load allowances to an agent, the file entry should look like the following example: Basic;Advanced;ChatOnly. Each load allowance should be separated by a (;) with no spaces in between.
- Private Telephones – telephone number needed when utilizing Private Phone as the default phone type for the agent. The phone number needs to be a ten digit telephone number.
- HPBX User – Only utilized in a Unified solution. This userID is the agent’s broadsoftID and would be provided by your Project Manager.
- Hang Up Line After each call – Mandatory Field. The entry found in the example field should be copied and pasted for all newly created and existing agents.
- Email Address – email address for an agent, but is not a mandatory field.
- Always Recorded – this will apply only to Overlay solutions. This will be enabled if the current ECS setup is an overlay solution and the agents are to be setup with call recording. ECS has an entirely different call recording platform for the ECS Unified solution. If call recording needs to be enabled for an agent it should be set to Yes, if disabled it should be set to No.
- Change Extension – gives the agent the ability to change their extension or endpoint where they wish to receive calls. Set this field to True if the agent should be able to change their extension or False if this option should be disabled.
- CRM – internal ECS contact manager functionality that allows agents to manage contact information and provides a full detail contact history of all the touches the customer has had with the organization. If the CRM needs to be enabled for an agent it should be set to Enabled, if disabled it should be set to Disabled.
- Delegate to Supervisor – allows agents to delegate an interaction to a supervisor. When the interaction is delegated it will show up in the Supervisor client, indicating they have a new delegation. If delegating to a supervisor needs to be enabled for an agent it should be set to True, if disabled it should be set to False.
- Skills – agents can be assigned individual skills and proficiency’s without needing to be assigned a (skill) profile. Skills can be assigned from already existing skills added under the Implementation tab or new skills can be created by adding and importing them through the .csv file. Whether assigning existing or creating and assigning new skills the file entry should look like the following example: Spanish|High;Sales|Medium;English|High. It should first contain the Skill followed by (|) followed by the proficiency level (Spanish|High) with no spaces in between. If more than one skill needs to be added to the agent each skill|proficiency should be separated by a (;) with no spaces in between.
- Chat Private Greeting – the chat private greeting must first be manually setup for one agent before having the capability to set it up via the upload for other agents. Once one agent has been setup with the proper chat phrase within the agents profile, the agents Account Name (ex. AIRELAB\plab.LizFox) can be inserted into the file next to all the other agents that should have Chat Private Greeting setup.
- Voicemail – the email and voicemail greeting must first be manually setup for one agent before having the capability to set it up via the upload for other agents. Once one agent has been setup with the proper email and voicemail greeting within the agents profile, the agents Account Name (ex. AIRELAB\plab.LizFox) can be inserted into the file next to all the other agents that should have voicemail setup.
- Example: Agent 1 has Chat Private Greeting and Voicemail setup in their profile. Select all the agents you wish to export to assign the chat and voicemail services. On export the Chat Private Greeting and Voicemail columns will always be empty within the .csv file. Copy and past the agents Account Name that has the Chat Private Greeting and Voicemail services already assigned next to all the other agents that should be setup with the same chat private greeting and voicemail settings.
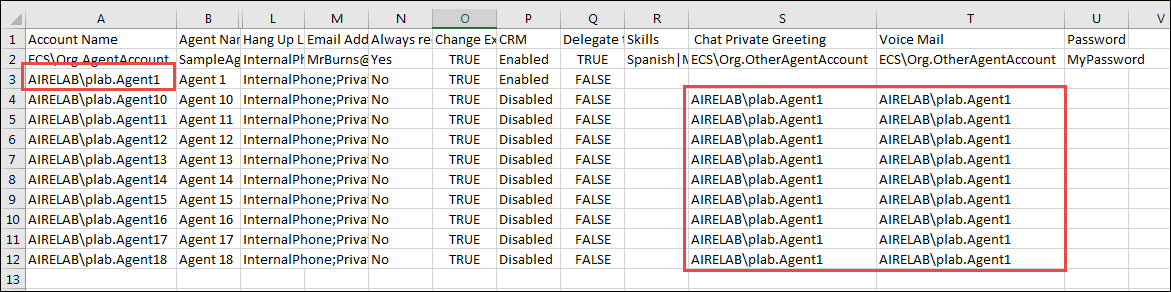
- Agent In Business Processes - Agents can be assigned to specific business processes as Active (True) or Inactive (False). When assigning an agent to multiple business processes a ";" should be used. (Technical Support|True;Sales|False)
- Supervisor Of Business Processes - Supervisors can also be assigned to specific business processes. When assigning an supervisor to multiple business processes a ";" should be used. (Technical Support;Sales)
- Password – (update) password is only supported for existing agents and cannot be set for new agents added to the imported file. This will allow supervisor and admins to reset an agents password if they get locked out or forget their agent client password. This field should be left blank if create a new agent, because the agents password must first be set to the agent default password.
- HPBX Registrar User - HPBX UserID but the @voip.evovlveip.net is not needed
- HPBX Registrar Password - On export this field will be blank.
How to Edit and Create Agents
- Select the agents you wish to edit. Select Export.
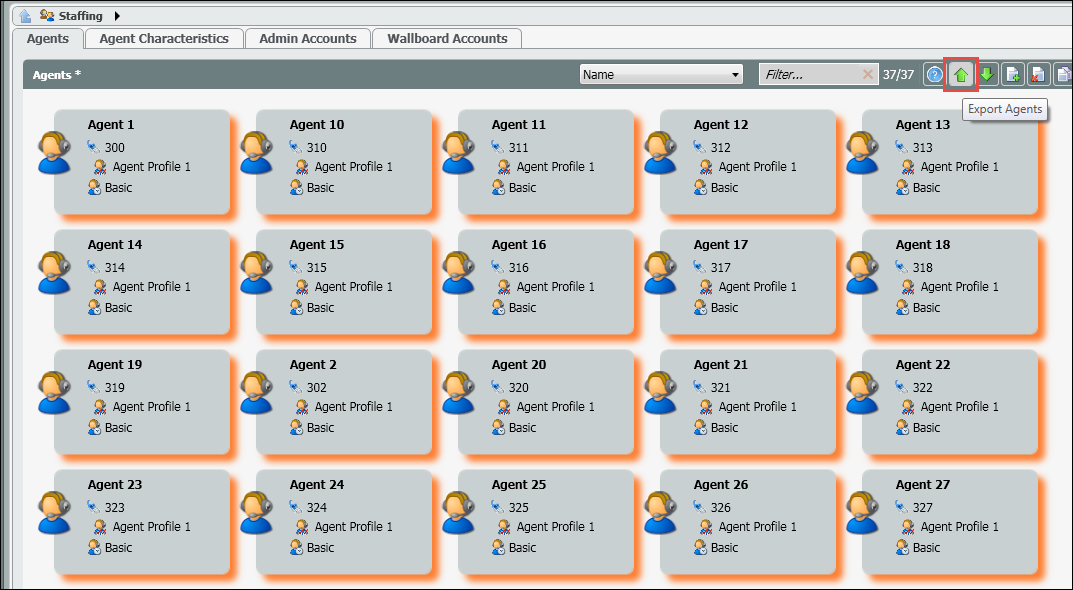
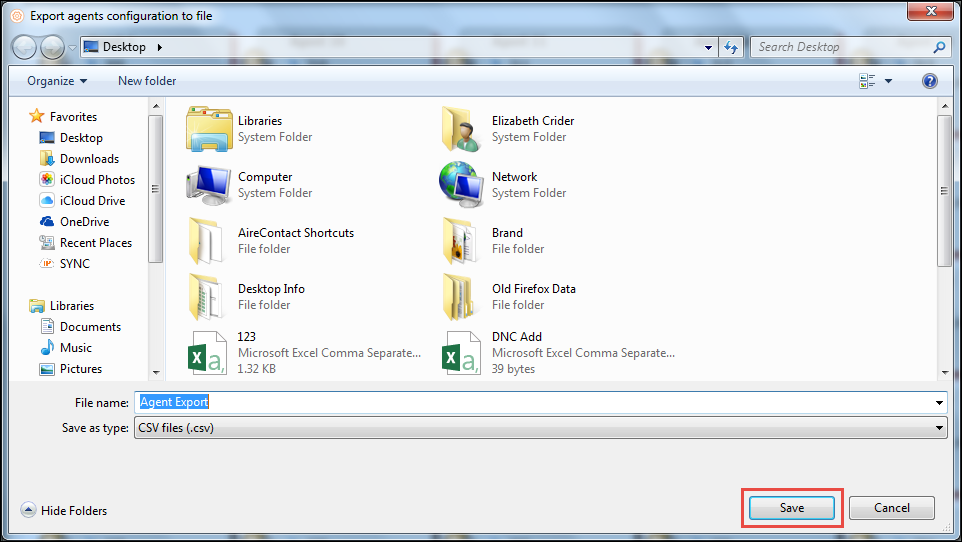
- Enter a file name. Save.
- Locate and open the exported file.
- Update any existing agents following the guidelines outlined above for any True/False, Yes/No, Disabled/Enabled options. Update any additional options including but not limited to Available Load Allowance, Password update, Skills, etc

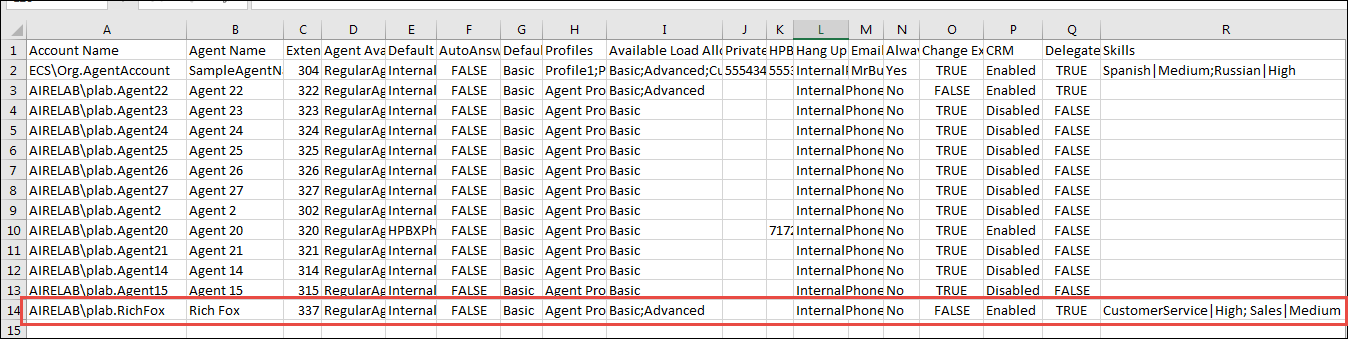
- If adding a new agent, enter in the new agents information on the next available column. In the example below a new agent was created along with a brand new skill and assigned proficiency within the exported file.
- Save all changes. Exit out of the file. You cannot import a file back into the Setup Client that is currently open.
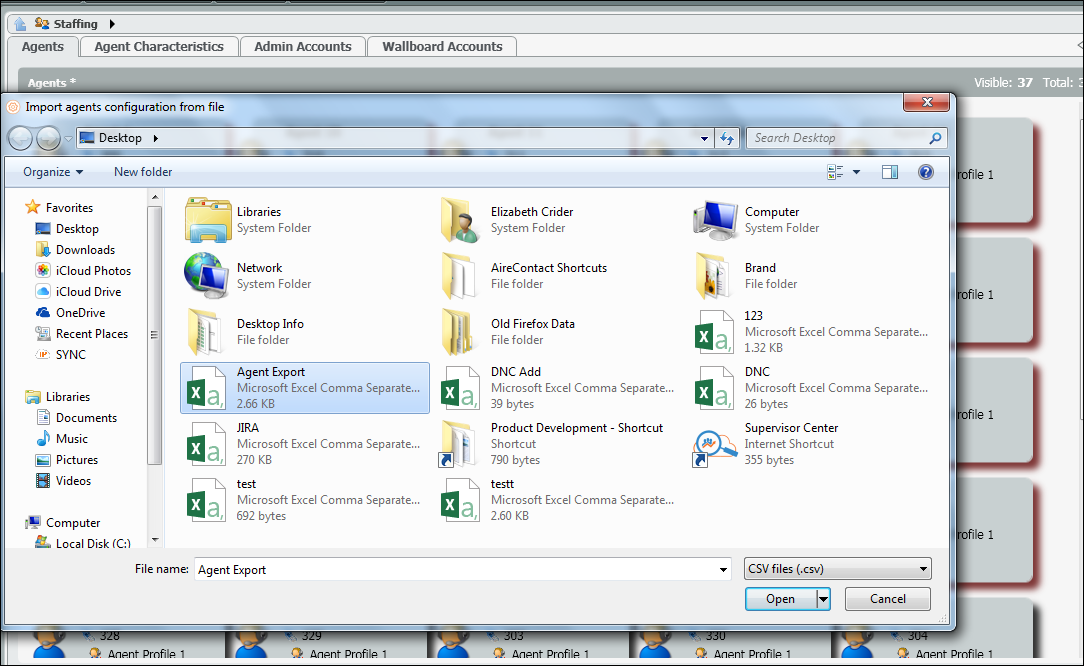
- Select the Import. Locate and open the recently saved file.
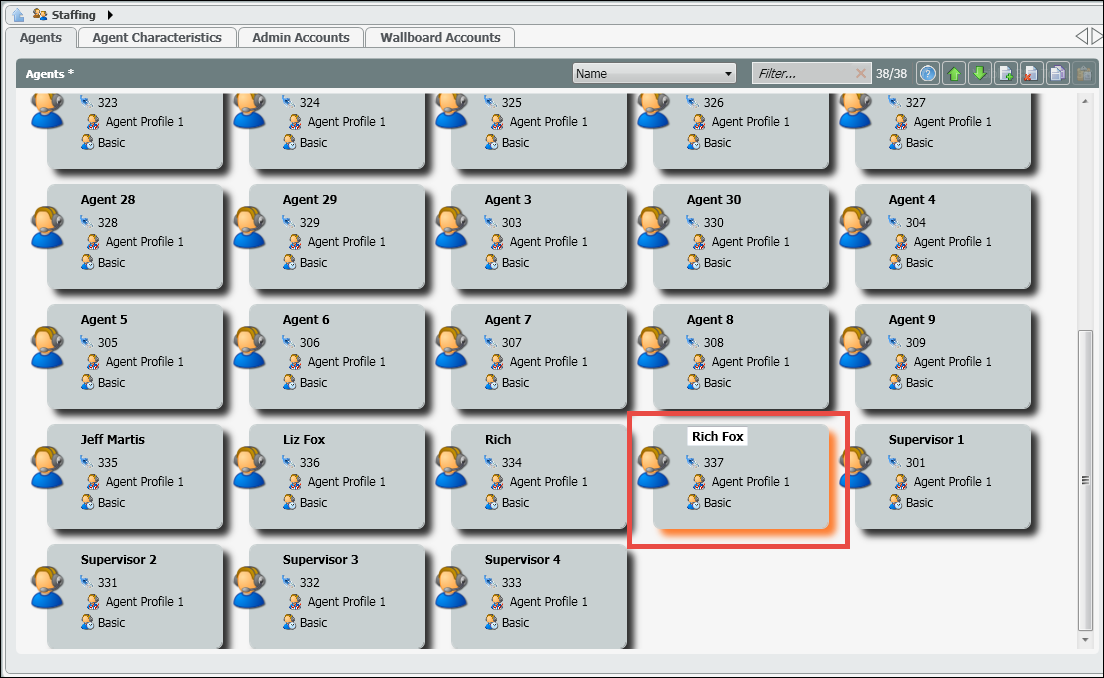
- If all edits and newly created agents were done correctly, you will receive a Confirm Import pop up.

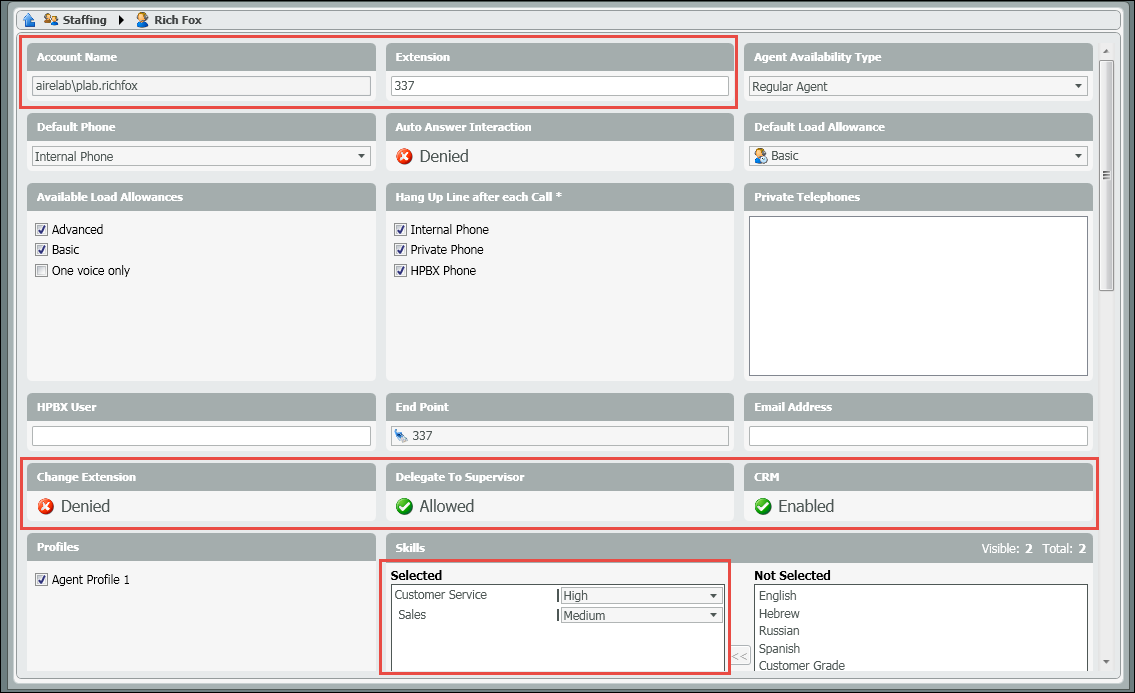
- The following screen shots show the newly created agent and the agents detailed profile. The profile highlights the agent characteristics that were different from the rest of the imported agents along with the newly created skills and proficiency’s
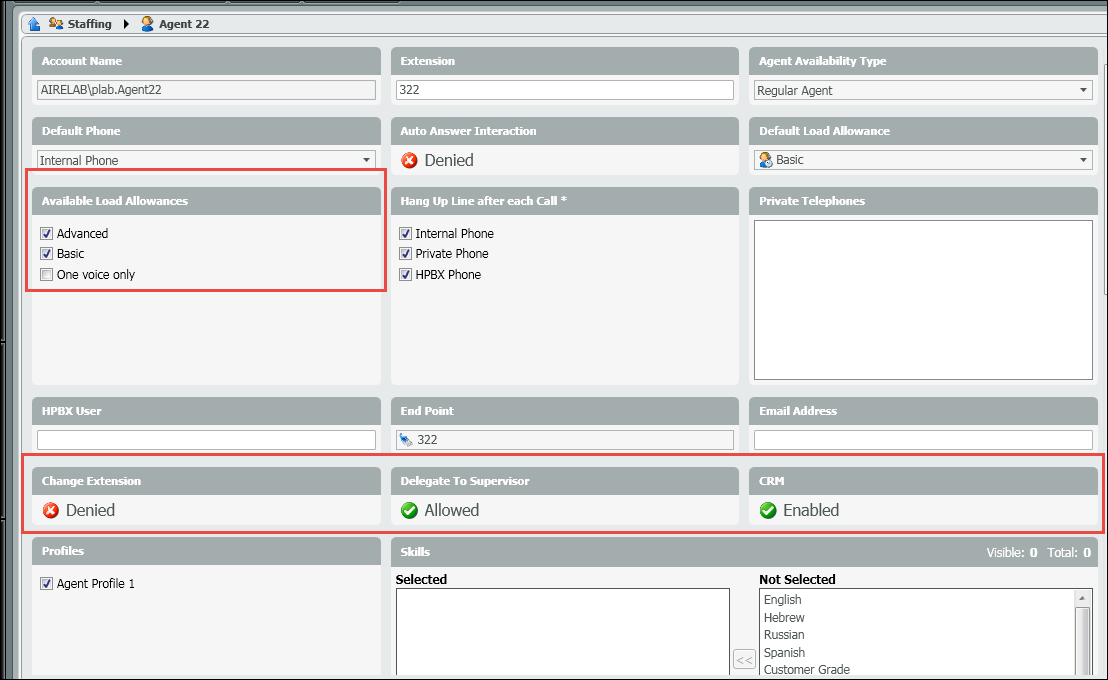
- The following screen shot shows the detailed profile of the existing agent, highlighting the characteristics that were updated on import.
- Deploy Changes
NOTE: The following fields must be unique when importing a file. If there are any duplicates, the import will fail.
- Account Name
- Agent Name
- Extension
- Private Telephone
- HPBX User