![]()
TABLE OF CONTENTS
| Table of Contents |
|---|
...
This guide covers the items you should review and configure to get your Trend Micro Worry Free tenant up and running based on your organizational requirements.
| Tip |
|---|
TIP The complete Trend Micro Worry Free Services online help can be referenced in the Trend Micro Online Help Center. |
Additional getting started information can be found in these articles:
| Children Display |
|---|
Sign Into the Worry Free Management Console
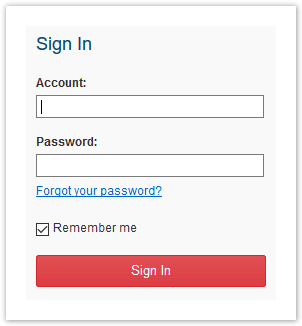
To access your Worry Free management console, use the below URL. On the sign in page, enter your account username and password.
https://wfbs-svc-nabu.trendmicro.com/?TenantID=66c2U
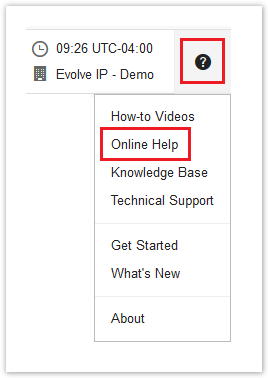
Getting Help
The Worry Free management console has a very robust online help system. For detailed information and step-by-step instructions, you should reference the online help system. If you are new to Worry Free, check out the How-To Videos provided by Trend Micro.
| Tip |
|---|
If you're not signed in to the Worry Free management console, the complete Trend Micro Worry Free Services online help can be referenced in the Trend Micro Online Help Center. |
If you need further assistance, please submit a ticket via the Evolve IP Support Page, or use the information listed in the Worry Free Technical Support page.
Licensing & Billing
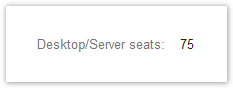
You are billed by Evolve IP for the number of server & desktop licenses (seats) allocated to your Worry Free tenant, not what you use. If you need to change the number of seats allocated to your Worry Free tenant, please submit a ticket via the Evolve IP Support Page or contact your Evolve IP
...
account representative.
To view your allocation, sign into the Worry Free management console, navigate to Administration > Licensing Information, and check the desktop/server seat count.
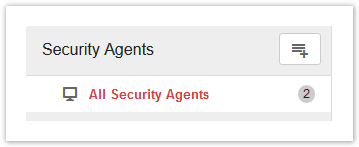
To view the number of seats you are using, navigate to Security Agents and check the number next to All Security Agents.
User Management & Permissions
Worry Free Tenant Admin Account
When a new Worry Free tenant is provisioned, the user account created during the provisioning process is assigned the tenant administrator role. This account has special permissions to view product licensing and to manage user accounts within the Worry Free Management Console.
| Warning |
|---|
IMPORTANT There can only be one tenant admin account, and the tenant admin account is the only account that can manage user accounts in |
...
your Worry Free management console. Additionally, when a tenant admin creates user accounts in the Worry Free management console, the usernames chosen must be unique across all Worry Free tenants managed by Evolve IP. Therefore, if you receive a message that a username has already been taken, it's because that username is being used in another Worry Free tenant managed by Evolve IP. |
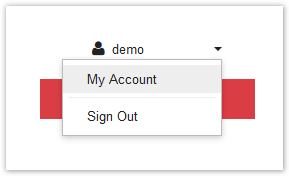
To manage the tenant admin account, sign into the Trend Micro Products/Services Portal, and click on My Account in the top-right corner of the page.
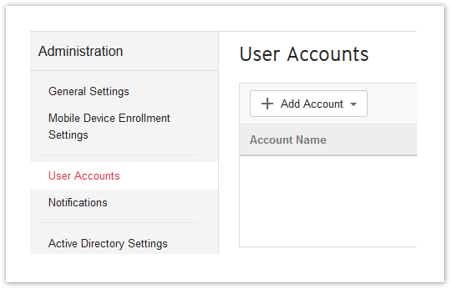
Worry Free Management Console User Accounts
Using the tenant admin account, sign into the Worry Free Management Console, and go to Administration > User Accounts
Role-Based Access Control (RBAC)
The Worry Free management console has 3 predefined roles that can be assigned to user accounts. These roles cannot be changed, and new roles cannot be created.
...
Can access all features and functions except user account management.
...
Password Resets
You reset your account password on the sign-in page. Evolve IP cannot reset passwords for you.
When you reset your password, the email address associated with your user account will receive an email notification with instructions.
| Warning |
|---|
IMPORTANT |
...
Administration Settings
Administration settings include the below. For detailed information about these settings, consult the online help from within the Worry Free Management Portal:
- Endpoint agent administrative settings.
- Mobile Device Enrollment Settings including Apple APN certificates and terms of use.
- User Account management.
- Notification settings (see next section).
- Active Directory sync set up and configuration (covered later in this document).
- Trend's Smart Protection Network configuration.
- BitLocker recovery keys.
- Administrative and Endpoint tools.
- Worry Free licensing information.
- Web console theme settings.
Notifications
Administration > Notifications
Configure Worry Free to send email messages for Action Required and Warning events. If needed, you can customize the messaging in your alerts and warnings along with the ability to set thresholds for the warning events. All emails are sent out in plain text from the Trend Micro email servers using a from address of WFBS-SVC@TrendMicro.com.
| Info |
|---|
Note: At the top of the Notifications configuration page is a link to an online help page that defines the variables (Trend calls them tokens) that can be used in your emails. Pay close attention to the Alert Type column. The variables listed can only work in those types of alerts. |
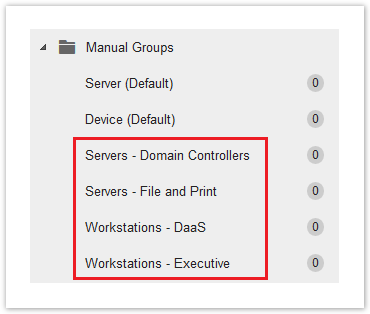
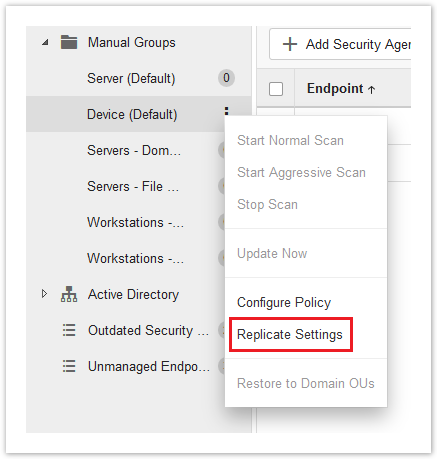
Manual Groups
Security Agents > Manual Groups
Manual Groups are custom groups that you create to categorize your endpoints and apply custom policies. Each group has its own set of policy settings, and the policy settings can be copied/replicated to other groups. To create new groups, click the Add icon in the top-right of the Security Agents area.
| Info |
|---|
Note: The groups cannot be nested, and they are sorted alphabetically. |
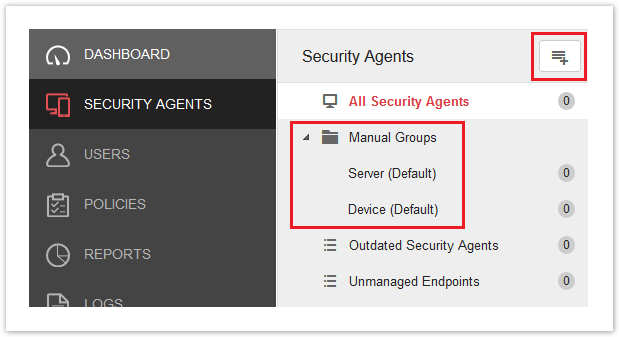
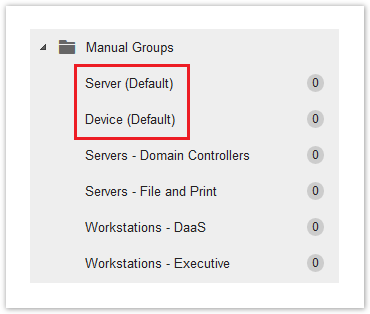
Default Manual Groups
The default groups are the permanent, out-of-the-box groups used to apply policies against endpoints that have not been assigned to a custom group or a domain group if AD sync is enabled. Both of the default groups have their own set of policies.
The Server (Default) group is for endpoints running Windows Server. The Device (Default) group is for endpoints running Windows client operating systems, Mac OS, Android, and iOS.
| Info |
|---|
Evolve IP can define the default policy settings to get you started. However, we strongly suggest you take the time to become familiar with all of the policy settings, and make changes based on your requirements. |
Manual Group Naming Suggestions
Here are some suggestions when creating manual groups for your endpoints.
Filter Groups
Manage endpoints based on specific criteria, such as an IP address range or operating system. There are two default, out-of-the-box filter groups to start with. To create new filters, click the Add icon in the top-right of the Security Agents area.
Filter criteria include:
- Endpoint Name
- Endpoint Type
- Operating System
- Manual Groups or Domain Groups
- Label
- IP Address
- Last Connected Time
Global Policies
One might think you go to the POLICIES section to manage all polices within Worry Free. However, this is not the case. Instead, you go here to manage global policy settings.
Global Policy settings apply to all managed endpoints in your Worry Free tenant. This includes:
- Global scan settings
- Locking down the agent installations and checking agent status
- Agent uninstallation restrictions
- Application Control Rules
- Exception Lists
- Web Reputation / URL Filtering
- Malware Scan Exclusions (Applies to Real-Time, Behavior & Machine Learning)*
- Device Control
| Warning |
|---|
*Important However, policies configured against manual groups or a domain group (AD synced OU), do accept the wildcard * character for folders and files. |
| Info |
|---|
Where applicable, the global exception lists can be overridden by policy settings configured against a manual group or a domain group (AD synced OU). |
Policy Groups
Policies Applied to Manual Groups
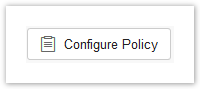
Each Manual Group in Worry Free has its own set of policy settings. To access a group's policy settings, select the group, and click the Configure Policy button.
Note that the policy settings for a manual group can be copied/replicated to another group.
In larger deployments, we recommend creating some empty groups and pre-configure them with certain settings that can be replicated to new groups in the future. For example, you could create a few groups with the word TEMPLATE in their name. Each template group would have a different set of policies settings, which you can replicate to new groups as a starting point.
For a full list of policy settings and their descriptions, consult the Worry Free Online Help.
Policies Applied to Domain Groups
Domain groups are created when you sync your Active Directory (AD) organizational unit structure to Worry Free. Each OU in your AD is represented as a Domain Group.
When it comes to policy settings, domain groups follow an inheritance architecture with each group inheriting the policy settings of its parent group. If needed, you can break the inheritance.
Configure Policy Settings
Policy settings are configurable in all Manual Groups and all Domain Groups when syncing Active Directory. The settings in a Manual Group can be replicated to another Manual Group. The settings in Domain Groups are inherited from their parent group, but the inheritance can be broken.
...
Role-Based Access Control (RBAC)
The Worry Free management console has 3 predefined roles that can be assigned to user accounts. These roles cannot be changed, and new roles cannot be created.
| Role | Description |
|---|---|
| Administrator | Can access all features and functions except user account management. Only the tenant admin account can manage user accounts. |
| Support Administrator | Can access all Security Agent management features and can also create reports. |
| Auditor | View only access to most features and functions. |
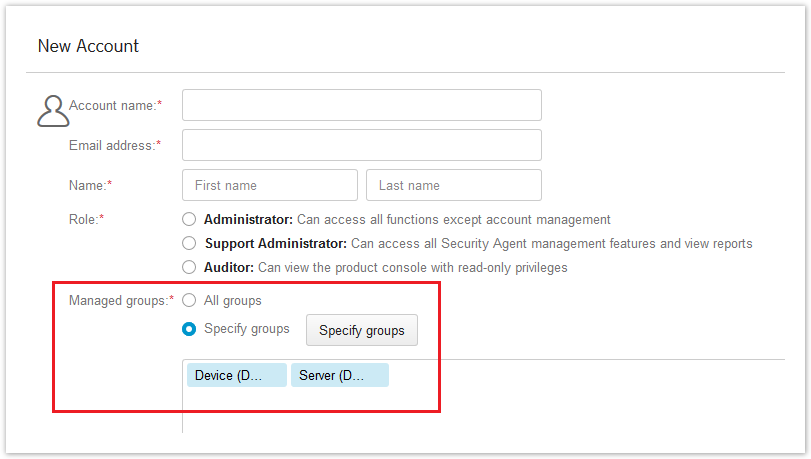
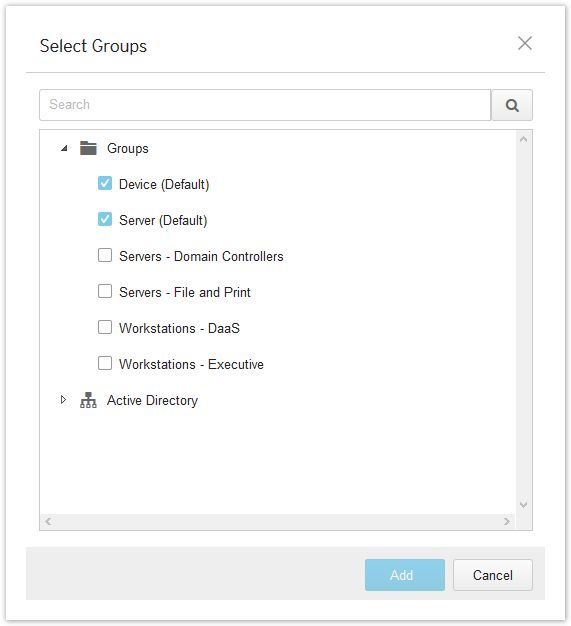
Group-Based Access Control (GBAC)
Group-based access control allows you to associate Worry Free user accounts with one or more Manual Groups or Active Directory OU groups, which allows you to scope a user account to a subset of endpoints to manage.
- Group-based access control can be applied to new user accounts or existing user accounts.
- All Groups is selected by default. Choose Specify Groups to associate one or more groups to the user account.
- The Device (Default) and Server (Default) groups cannot be excluded (deselected).
- You have to sync your local Active Directory before you can choose one or more OU groups.
Administration Settings
Administration settings include the below. For detailed information about these settings, consult the online help from within the Worry Free
...
Policy: Target & Service Settings
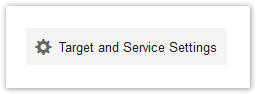
From here you can do the following:
- Enable the Unauthorized Change Prevention Service on Windows Server and Windows Desktop endpoints (hover over the info icon for more information).
- Check which Manual Group or Domain Group the policy is targeting. If you forget which policy you are editing, check here instead of closing the policy editor.
- If you have configured AD sync, you can restore a broken policy inheritance for a domain group.
Policy: Operating System & Device Type
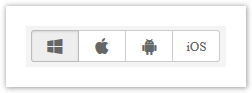
Choose an operating system to configure in the policy. If needed, turn off all policy modules for the operating systems that will not be configured for the policy. For example, if you're configuring a policy for Mac computers, turn off all of the modules in the Windows operating system.
Note that the Windows operating system has the most policy settings. The others are limited in the amount of settings.
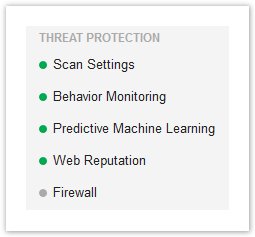
Policy: Threat Protection Settings
Select the modules you wish to enable/disable & configure.
| Info |
|---|
Behavior Monitoring & Firewall are only available on the Windows OS. |
Policy: Data Protection Settings
Select the modules you wish to enable/disable & configure.
| Info |
|---|
Data Loss Prevention is only available for the Windows OS. |

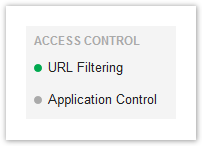
Policy: Access Control Settings
Select the modules you wish to enable/disable & configure.
| Info |
|---|
The Access Control modules are only available for the Windows OS. |
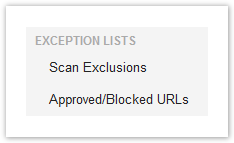
Policy: Exception Lists
These exception lists override the global exception lists. They are not in addition to the global exception lists.
Also, there is no way to copy a global exception list into these exception lists. So, plan accordingly, and consider creating empty group templates as described in the above policy groups section. This will allow you to make changes to the template group, and then copy/replicate the changes to other groups.
| Info |
|---|
Blocked URLs are not available on the Mac operating system. |
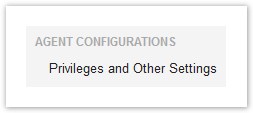
Policy: Agent Configuration Settings
Manage a user's interactions with the agent installed on their endpoint. This includes giving a user the permissions to run a manual scan, view firewall settings, and configure alert settings.
You can also prevent users and other processes from modifying the Trend Micro program files, registries, and processes. Enabling this setting is highly recommended.
Active Directory Synchronization
Administration > Active Directory Settings
Active Directory integration allows you to manage your endpoints using your Active Directory (AD) organizational unit (OU) structure. You can set up automatic synchronization with your Active Directory structure using the Trend Micro Common Active Directory Synchronization Tool.
The following are some general notes and observations that are not included with the integration instructions provided by Trend Micro. This should help with planning and troubleshooting your AD integration.
General Notes & Observations
- After configuring AD synchronization, the Worry Free management portal will show you an empty structure of the OUs in your Active Directory.
- The "Computers" container in AD is not shown in the Worry Free management portal, nor is it scanned or synced. Therefore, computer accounts in this container will not show up in the management portal until the agent is installed. After the agent is installed, the computer will show up in the Manual Server or Device "default" groups.
- In the Worry Free management portal Trend refers to each OU as a Domain Group. You cannot remove or hide the domain groups that you don't want to use.
- When you create or remove OUs in your AD, these changes will be reflected in the Worry Free management console after the next sync.
- All of the domain groups shown in the Worry-Free management portal inherit their policy settings from the policy settings set at your top-level domain name (* domain.com).
- You can break the policy inheritance for down-level domain groups to give them their own policy settings. When you break the inheritance of a down-level group, child groups within that parent group are broken too, and the child groups start inheriting from the parent group that broke its inheritance.
- If needed, you can restore a group's policy inheritance, but that group will lose all custom policy settings.
- Computer accounts in an OU will show up in their respective domain group after the agent is installed.
- If a computer account is moved between OUs in Active Directory, the computer will be moved in the domain group structure of the management portal after the next sync. If you force a sync, it can take up to 10 minutes for the change to show in the portal.
- If you already installed the agent on computers in your AD and they have been assigned to manual groups in the Worry Free management portal, they will remain there until you select them in the portal and choose the "Restore to Domain OUs" task.
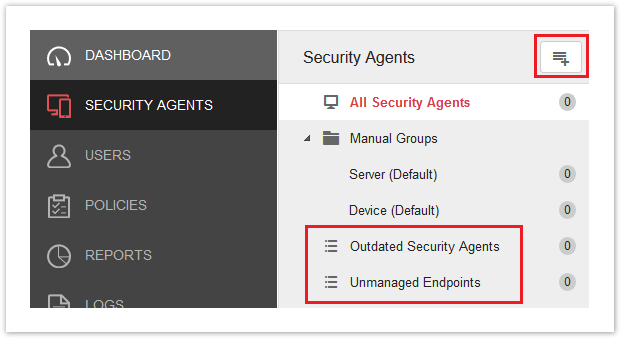
- Computer accounts found in AD OUs that don't have an agent installed are displayed in the "Unmanaged Endpoints" filter group.
Trend Micro AD Sync Tool Deployment Notes
- You should create an AD service account for the sync tool to use. The service account doesn't need any special permissions, unless AD permissions have been configured to deny reading objects.
- When defining a Root DN path, OUs cannot be included in the path. This means your entire OU structure will be visible in the management portal.
- The synchronization frequency should be based on the frequency of changes anticipated in your directory.
- For directories that are not properly managed and kept up to date, use the exclude computers setting. Otherwise, you can leave it unchecked.
- When entering the service account's username in the sync tool, use the account's UPN.
- When upgrading the sync tool to a new version, you must uninstall the old sync tool first.
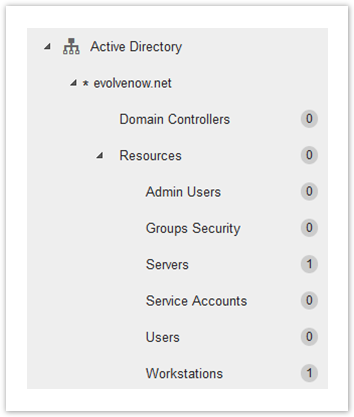
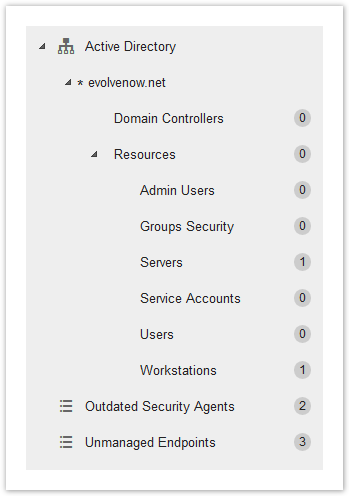
Here's an example screenshot of what a synced AD OU structure looks like in the Worry Free management portal.
Windows Agent Deployments
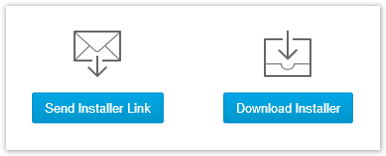
There are 2 ways to deploy the Windows agent:
- Send Installer Link - Send a user an email that includes a link to download and install the agent.
- Download Installer - Download the agent installer and use a deployment script or a management server to deploy the agent.
Windows Agent Requirements
The following requirements must be met before installing the agent:
- The endpoint has network connectivity to the Trend Micro Worry Free SaaS environment via the Internet.
- The user account used to install the agent is a local administrator.
- The remote computer is running a Windows operating system:
- Windows 7 SP1 or newer, fully patched.
- Windows Server 2008 R2 or newer, fully patched.
Considerations for Deploying the Windows Agent
Whichever method you use to deploy the agent, you should consider a few things:
- Reboot the endpoint before & after the agent installation. If Windows Defender is running, the agent installer will disable the service, which takes effect after a reboot.
- Trend claims that the agent installer will remove other antivirus software packages. You should test this before rolling out to production.
- If your endpoints are currently running Trend's Deep Security agent, it will need to be uninstalled before installing the Worry Free agent. You should reboot the endpoint in between the uninstall of Deep Security and the install of Worry Free.
- When using the Send Installer Link method, we recommend that you copy the link generated in the management console and paste it into an email customized for your organization.
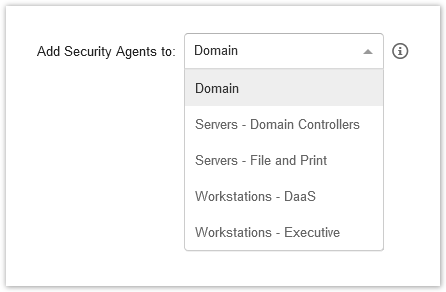
- Use the "Add Security Agent to" drop-down menu (see below screenshot) to define where the endpoint should be added within the management tree.
- If AD synchronization has been configured, choose "Domain" from the drop-down menu.
- If you are using manual groups, choose one of the groups from the drop-down menu.
- When you download the installer, give it a name that defines where the endpoint will be added within the management tree. Here are some examples:
- WFBS-SVC_Agent_Installer-Domain.msi
- WFBS-SVC_Agent_Installer-<ManualGroupName>.msi
Windows Agent Updates
By default, the Trend Micro "ActiveUpdate" service in the agent checks for updates hourly.
The ActiveUpdate service provides the latest downloads of virus pattern files, scan engines, and program files through the Internet. ActiveUpdate does not interrupt network services or require you to restart endpoints.
Additionally, the ActiveUpdate service supports incremental updates of pattern files. Rather than downloading the entire pattern file each time, the ActiveUpdate service can download only the portion of the file that is new, and append it to the existing pattern file. This efficient update method can substantially reduce bandwidth needed to update your antivirus software.
For detailed information about the agent update processes and the components that get updated, check the online help under the Security Agent Management section.
Ransomware Protection
The ransomware protection in Worry Free uses the Behavior Monitoring feature within the agent. Because ransomware is a rapidly moving target, the behavior monitoring feature will likely cause some false positives.
To deal with these false positives, you'll need to exclude certain applications from being watched by behavioral monitoring, which can be done globally or within each individual policy.
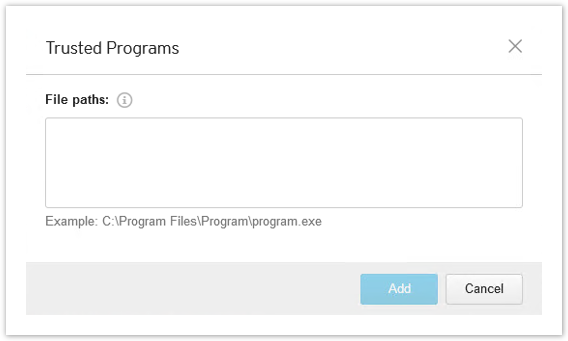
Global Exclusions
To exclude apps globally: Policies > Global Exception Lists > Trusted Windows Program List
- The Trusted Program List does not accept wildcard characters. It must be a full path to the program.
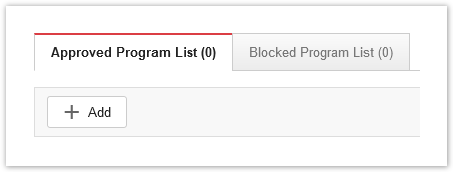
Policy Group Exclusions
To exclude apps in a policy: Windows OS > Exception Lists > Scan Exclusions
- Scroll down to the Behavior Monitoring section, and add your path to the Approved Program List.
- The Approved Program List does accept the “*” wildcard character, but you should be careful when excluding entire folder trees.
Reporting

In the Reports section, you can create & schedule (weekly & monthly) PDF reports to view summaries and details about detected threats. Reports also include rankings to identify the most vulnerable endpoints.
Inventory/Status Report
You cannot create an inventory/status report from the Reports section of the Worry Free management console.
However, there is a manual workaround for creating an inventory/status report, which is to export a CSV file in the Security Agents section.
- Go to the Security Agents section and click on All Security Agents.
- Click the Gear icon on the far right-hand side to show/hide the columns you wish to include your CSV export.
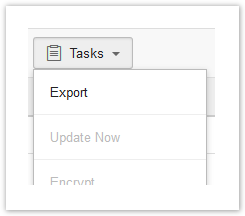
- After you have configured your view of the endpoints, select the Tasks menu, and then click on Export.
- A CSV file will get generated that you can download to your local computer.
...