In This Article |
Overview
This article will show you how to configure Azure AD as an Identity Source with Clearlogin, which allows for authentication against user accounts in Azure AD.
When using Azure AD as an Identity Source for Clearlogin users will not be able to make password changes or resets via Clearlogin. Users and admins will have to perform password changes and resets via Microsoft's given methods. |
Configuration Steps
Configuration: Clearlogin
- Sign into the Clearlogin Admin Console: https://admin.clearlogin.com
- In the left navigation bar, browse to: Identity Sources
- Click on the New Identity Source button, and then select Azure AD
- Display Name: Azure AD
- User Domain: yourdomain.com
- Access Tag: Azure AD
- Priority: 5
- Timeout: 10 seconds
- Click on Create Open Identity Source
- On the summary page, scroll down and Copy the SSO Callback URL (Redirect URI) to your clipboard.
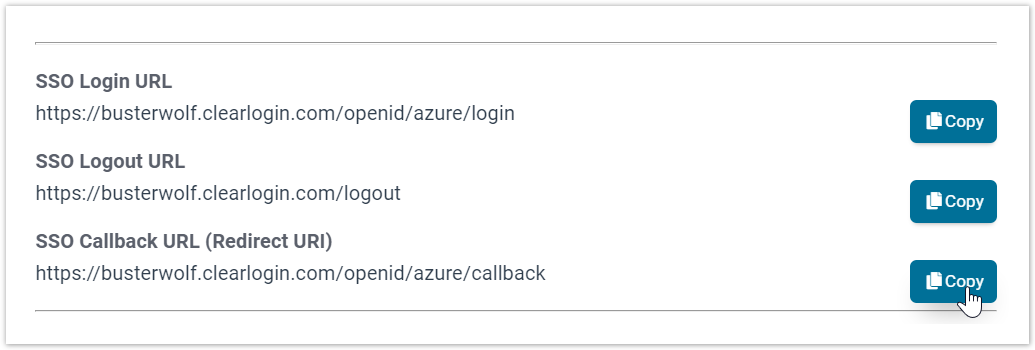
- Click on Edit. We will come back to this page later.
Configuration: Azure AD
- Open a new tab in your browser and sign into the Microsoft Azure AD portal with a user account that has the global admin role: https://aad.portal.azure.com
- From the left navigation bar, select Azure Active Directory
- In the sub-nav bar, click on App Registrations
- Click on + New Registration to create a new app registration for Clearlogin
- Name: Clearlogin Connection
- Supported Account Types: Accounts in this organizational directory only...

- Redirect URI (drop-down menu): Web
- Redirect URI (text field): Paste in the SSO Callback URL you just copied from the Clearlogin portal.
- Click on Register to create the app registration.
On the summary page, copy the Directory (tenant) ID to your clipboard.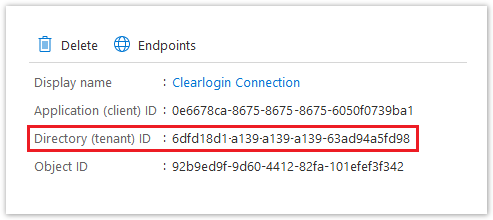
Configuration: Clearlogin
- Switch back to the Clearlogin portal tab in your browser
- Scroll down to the Endpoint text box
- Paste in the Directory (tenant) ID you just copied from the Azure AD portal, and click Retrieve Endpoints.
- You should see a message that says: Endpoints successfully Retrieved.
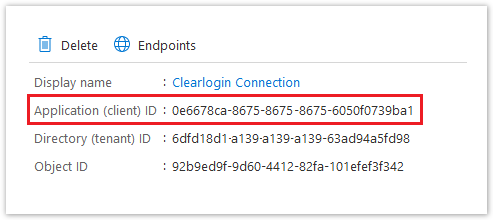
- Switch back to the Azure AD portal tab in your browser, and copy the Application (client) ID.
- Switch to the Clearlogin portal tab in your browser
- Scroll down to the Client ID field
- Paste in the Application (client) ID you just copied from the Azure AD portal.
Configuration: Azure AD
- Switch back to the Azure AD portal tab, and click on Manifest in the sub-navigation bar.
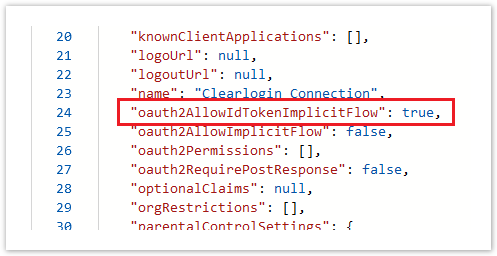
- In the Manifest editor, change the oauth2AllowIdTokenImplicitFlow property to true.
- Scroll down to the replyUrlsWithType property
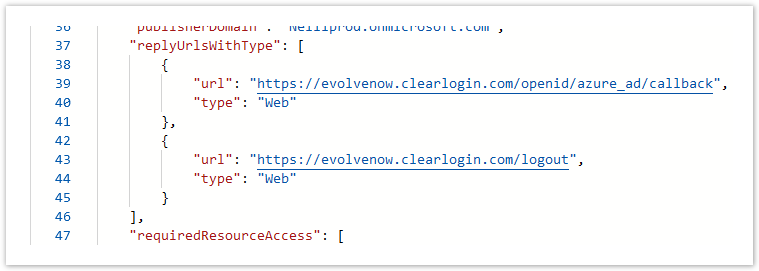
- Add a comma after the closing curly brace under the "type": "web" line, then create a new line below the closing curly brace.
- Paste the following into the new line, and then make sure you replace yourclearloginsubdomain in the URL with your Clearlogin subdomain:
{
    "url": "https://yourclearloginsubdomain.clearlogin.com/logout",
    "type": "Web"
}
- When you are done, your changes should look similar to this screenshot (note the comma that separates the two entries for replyUrlsWithType).
- Once you're done, click on Save at the top of the editor.
- Click on API Permissions in the sub-navigation bar.
- Click on + Add a Permission to give Clearlogin the permissions to read the user accounts in Azure AD.
- In the flyout panel, click on Microsoft Graph
- For the type of permissions, click on Application Permissions
- Scroll all the way down and expand the User category
- Select: User.Read.All
- Click on Add permissions to finish the config.
- Click on the Grant Admin Consent for... button.
- Click on the Refresh button to make sure that your changes properly saved, and the warning message goes away.
- Click on Certificates & Secrets in the sub-navigation bar.
- Click on + New client secret
- Description: Clearlogin Connection
- Expires: In 1 Year (DO NOT select Never for the expiration)
- Click Add
- Copy the Value field to the clipboard. Do not copy the ID field.
- Switch to the Clearlogin portal tab in your browser
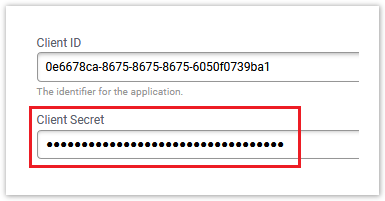
- Paste the secret password into the Client Secret field. Do Not click the Generate button.
- Scroll down and click on the Update OpenID Identity Source button.
This completes the steps to setup Azure AD as an identity source in Clearlogin.
Your next steps are to sign into Clearlogin using the credentials of a user account in Azure AD.
Troubleshooting
If you are experiencing issues with signing into Clearlogin using Azure AD as the identity source, check the following in Azure AD & Clearlogin.
Azure AD Manifest
- Go to: Azure AD > App Registrations > Clearlogin Connection > Manifest
- Make sure your manifest saved after making the required changes. We have experienced times when the changes we made did not save. Your manifest should look similar to these screenshots:


Azure AD API Permissions
- Go to: Azure AD > App Registrations > Clearlogin Connection > API Permissions
- Make sure the status of your API permissions have green check marks and show granted for your organization. If not, click the Grant Admin Consent... button.
- The API Permissions should look similar to this screenshot.

Azure AD Identity Comparison
- Go to: Azure AD > App Registrations > Clearlogin Connection > Overview
- Compare the Application (client) ID and the Directory (tenant) ID with the Clearlogin configuration.
In Clearlogin, compare the Endpoint with the Directory (tenant) ID in Azure AD.
In Clearlogin, compare the Client ID with the Application (client) ID in Azure AD.
In Clearlogin check the Endpoints box, and then compare the listed endpoints with the Directory (tenant) ID in Azure AD.
Azure AD App Secret
- Generate a new App Secret in Azure AD
- Go to: Azure AD > App Registrations > Clearlogin Connection > Certificates & Secrects
- Delete the existing Clearlogin Connection secret
- Click on + New client secret
- Description: Clearlogin Connection
- Expires: In 1 Year (DO NOT select Never for the expiration)
- Click Add
- Copy the Value field to the clipboard. Do not copy the ID field.
- Switch to the Clearlogin portal tab in your browser
- Paste the secret password into the Client Secret field. Do Not click the Generate button.
