In This Article
Overview
Clearlogin access rules are used to limit access to the User Dashboard and the apps you have enabled in Clearlogin. When you build an access rule, you can restrict access to the dashboard, and the apps, by using one or more of the following categories:
- Identity Sources
- Individual Users or Groups of Users
- MFA providers
- Time Windows
- Public IP Addresses or Subnets
- Countries
By default, the Default Access Rule allows anyone that successfully signs in to access the dashboard and all apps you have enabled in Clearlogin.
Planning for Access Rules
Planning becomes very important when you start creating access rules. Here are some things to consider:
- Will the access rule be used to allow access or deny access?
- Will the access rule be applied to users in one or more identity sources?
- Will the access rule be applied to individual users or a group of users?
- Will there be restrictions based on public IP addresses or countries of origin?
- Will multi-factor authentication be required to sign in?
- Will there be certain time windows when a user can sign in?
- What will be the priority for each access rule?
The Default Access Rule
By default, Clearlogin is configured with an access rule called, Default Access Rule, that allows all users to access all application connectors. This means all users who successfully sign into Clearlogin will be assigned the Default Access Rule, and will have all application connectors shown in their app dashboard.
If you choose to create your own custom access rules, make sure you disable this rule, or remove the Everyone search filter in the Who? section.
Rule Priority & Stacking
Each access rule can be set to a priority (1 - 20) with 1 being the highest priority and 20 being the lowest priority. This allows you to create up to 20 rules. However, you can set rules to have the same priority, which allows you to create more than 20 rules.
Some info about how rules are evaluated:
- The order of evaluation is shown in the access rules summary page with the top-most rule evaluated first.
- If two or more rules have the same priority number, Clearlogin will evaluate the rule with the oldest creation date first, and the newest creation date last.
- All rules with Stacking enabled will be evaluated until a rule with Stacking disabled is encountered.
- By default, Stacking is enabled for all rules. If you disable stacking in a rule, Clearlogin will stop evaluating all rules after that rule.
Denying Access
An access rule can be used to deny a user, or a group of users, access to the Clearlogin dashboard. For example you can deny access based on the following:
- Public IP Address or country of origin
- Time of day
- Group membership
Keep in mind that it may be easier to create an Allow access rule that restricts access rather than a Deny access rule.
Access Tags
When a user signs into Clearlogin each access rule in the list is evaluated until there is a rule where Stacking is disabled, and if any of those access rules match to the user, the rule is assigned to the user's profile, and it's called an Access Tag.
Let's repeat this: When a user matches to an access rule, the name of the access rule is assigned to the user's profile, and it's called an Access Tag.
- Access tags are used to associate one or more users with one or more applications.
- Access tags are also used to aggregate users together based on which identity source the user belongs to.
A user can identify which access tags apply to them based on the tags listed in their profile summary, which can be viewed by clicking on their avatar picture in the top right-hand corner of the dashboard.
If you rename an Access Rule that's used as an Access Tag in an application, this will break the Rule/Tag association. Before renaming any access rules, make sure you take an inventory of the rule's association with applications.
Identity Source Search Filters
Search filters in an access rule are used to narrow the scope of users or groups in an identity source for which the access rule will apply.
Active Directory
- In an instance of Microsoft Active Directory an LDAP Query is used to narrow the scope.
- More info from Microsoft: Search Filter Syntax
- More info from Microsoft: LDAP Queries with a Long List of Examples
Common LDAP Queries
| Scenario | LDAP Query |
|---|---|
| Search for a user that is a member of a group | (&(sAMAccountName={{username}})(memberOf=CN=Clearlogin Admins, OU=Groups, DC=domain, DC=com)) |
| Search for users with a certain name | (&(sAMAccountName={{username}})(CN=John Smith)) |
| Search for a user with a certain username | (&(sAMAccountName={{username}})(sAMAccountName=jsmith)) |
Clearlogin Directory
- In an instance of Clearlogin Directory you would use the "groups" attribute with the value of the attribute being the group's name.
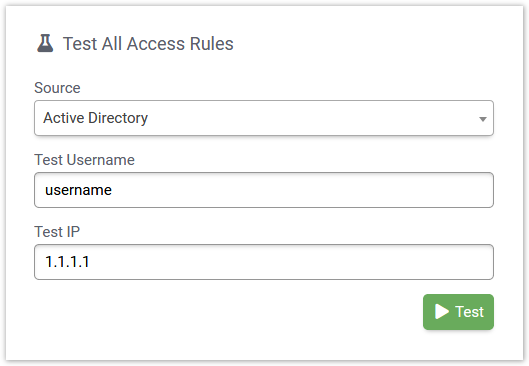
Testing Your Access Rules
Access rules can become complicated very quickly, especially when you create multiple access rules. For this reason, there is a means for testing your access rules against a user account in an identity source. You can also define a public IP address to test against.
We recommend you test your rules after creating new rules and after making any changes.
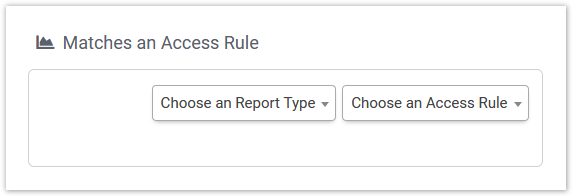
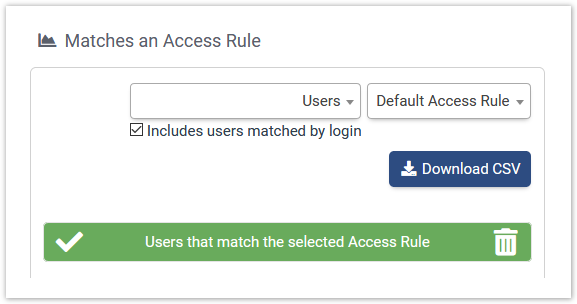
You can also generate a report on which users or applications are affected by an access rule:
- Select the Report Type: User or Application
- Then choose one of your access rules from the list
The report is built as soon as you select your access rule, and if needed, you can download a CSV file of the results.
Create an Access Rule
- Sign into the Clearlogin Admin Console: https://admin.clearlogin.com
- Select Security > Access Rules from the left-hand navigation bar.
- Click the Add New Access Rule button.
- When you're done with the configuration, click the Create Access Rule button at the bottom of the edit page.
General Settings
| Access Rule Name | The name of your access rule. This name will be applied as an access tag to matching users. |
|---|---|
| Policy | Define what Clearlogin will do if this rule matches.
Default: Allow Access |
| Multi-Factor Authentication | If you have enabled a multi-factor authentication provider, you can choose it from the drop-down menu, which will require it to be used for this rule. Default: Not Required |
| Allow Device Remembering | When an MFA provider is selected, this setting appears. It allows users to remember their device and bypass MFA for a period of time. Default: Enabled |
User/Group Settings
These settings define users and groups for which the rule will be applied. The default is Everyone.
If you restrict the rule to a set of users and/or groups, make sure you delete the entry for Everyone.
| Search Filters | Create one or more search filters to narrow the scope to a group of users for which the rule will apply. The type of search filter you can create is determined by the type of identity sources you have configured in Clearlogin.
Default: Everyone |
|---|---|
| Specific Users | You can add specific users to apply this rule to. These users must have a user profile in Clearlogin to show up in the list. Default: None |
Time Settings
Specify one or more time ranges and days of the week that you want this rule to be applied. Times are based on the Eastern timezone in the US.
| Start Time | HH:mm:ss.SSS AM/PM Default: 12:00:00.000 AM |
|---|---|
| End Time | HH:mm:ss.SSS AM/PM Default: 11:59:00.000 PM |
| Days of the Week | Sunday - Saturday Default: ALL |
Location Settings
| CIDRs | Enter one or more public IP addresses or subnets in CIDR format.
Default: 0.0.0.0/0 (All IP Addresses) |
|---|---|
| Add Multiple | Click the button to upload multiple CIDRs using a simple CSV or plain text file.
|
| Country | Add one or more countries to allow all known public IPs from the countries. Default: None |
| Identity Source | Specify one or more identity sources to apply to users in the identity sources. If none are selected, then any Identity Source will match. Default: None |
Additional Settings
| Priority | Set the priority for this rule, 1 being the highest priority. Rules with the same priority will be sorted by creation date, with the oldest taking priority. Default: 5 |
|---|---|
| Redirect on Login | Redirect to a specific URL after successful login. Leave blank to avoid redirection. Default: None |
| Stackable | If a rule is stackable, additional rules will be applied after, sorted by priority, until either no more rules are found or until a non-stackable rule is found. Default: Enabled |
| Enabled | Enable or disable the access rule. Default: Enabled |
`{{`}}`