In This Article
Overview
Microsoft Teams Emergency Calling provides the capability to configure and route emergency calls dynamically based on the current location of the Teams client. Furthermore, onsite personnel can be notified when an emergency call is made by a Teams user.
This article covers the information and planning requirements for organizations to configure Teams Emergency Calling. Additionally, this article covers information for organizations in the United States to comply with Kari's Law and RAY BAUM'S Act.
For some organizations, the configuration of Teams Emergency Calling can require a significant amount of planning and documentation. Regardless of the size or the complexity of your organization, Teams Emergency Calling must be deployed correctly because the life of an employee may depend on it working properly.
NOTE
It is your organization's responsibility to comply with all laws and regulations regarding emergency calling in your jurisdiction.
We recommend you investigate and determine your organization's required compliance with laws and regulations regarding calls to emergency services. Your legal, human resources, and security/compliance departments can facilitate this process by helping to create policies & procedures, and to identify and reduce any risks or liabilities.
In the United States, both Evolve IP and Microsoft provide technologies and systems to comply with the RAY BAUM’S Act for Multi Line Telephone Systems (MLTS). The RAY BAUM'S Act extends the Kari’s Law requirements, which went into effect in early 2021.
For more information about the RAY BAUM'S Act and Kari's Law, see the following FCC (U.S. government agency) pages:
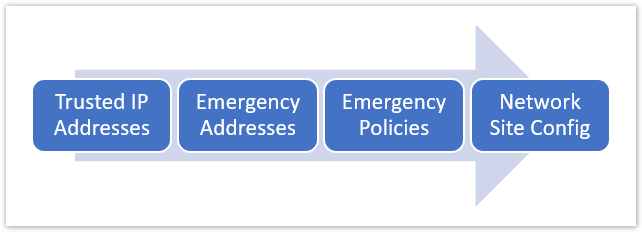
Configuration Process Overview
The following is an overview of the Teams Emergency Calling configuration process:
- Add all corporate public IP addresses (IPv4 & IPv6) to the Teams Trusted IP Addresses list.
- Add one or more Emergency Addresses (Civic Address & Places) for each building/office location.
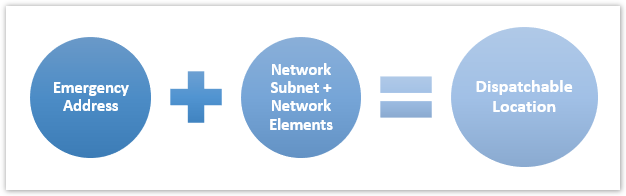
- Each Emergency Address is associated with one or more of the following network elements to create dispatchable locations for emergency responders:
- Network Subnets (required)
- Wireless Access Points (optional)
- Network Switches and Ports (optional)
- Create one or more Emergency Calling Policies. Typically one for each building.
- Create one or more Emergency Call Routing Policies (Direct Routing Only). Typically one for each set of direct routing SBCs.
- Create one or more Network Site configurations and associate each Network Site with a set of Emergency Policies.
Trusted IP Address List
Public IP addresses (IPv4 & IPv6) are added to the Teams Trusted IP Address list, and are used by the Teams client to determine if the user's device is on the corporate network.
- Document a list of public IP addresses (IPv4 & IPv6) for all routers, firewalls, or other perimeter devices that provide user access to the Internet. This should include all buildings and data centers.
- Entries can be made for one or more single IP addresses, or a range of IP addresses based on an address and subnet mask.
- Adding IPv6 addresses are not required, but they are recommended by Microsoft.
NOTE
If the user's device is not on the corporate network, the Teams client will not assign an Emergency Address. However, the Teams client can be configured to retrieve a location from the operating system, or the end user can manually enter an address for their location into the Teams client.
IMPORTANT
If you obfuscate your public IP addresses internally by using a proxy or other service, you cannot configure emergency calling. The Teams client uses public IP addresses to determine whether it is located on the corporate network.
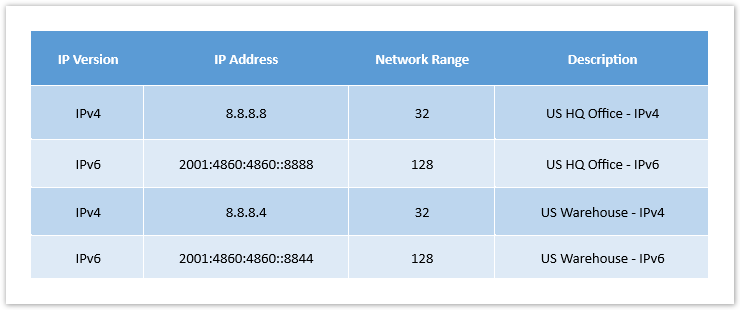
For planning and documentation purposes, you can use the below fictional example that shows four Trusted IP Address entries configured for a company that has two buildings in the US.
Emergency Addresses
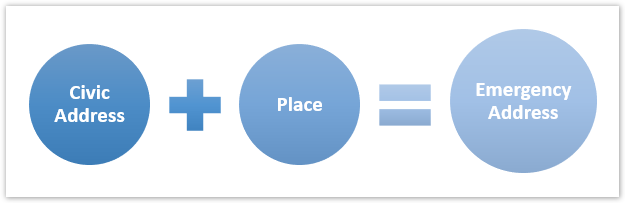
In Microsoft Teams, an Emergency Address has 2 parts:
- Civic Address - This is the parent record of the Emergency Address, and represents a location's physical street address and Latitude/Longitude coordinates. It's also known as a location's front-door address.
- Place - This is a child record associated with the parent Civic Address, and represents a specific place within a Civic Address. You can specify one or more Places in a Civic Address, and there can be any combination of floor, building, wing, zone, pod, office number, etc. to create an Emergency Address.
NOTE
Microsoft also refers to an Emergency Address as an Emergency Location. They are the same thing. They both have a Civic Address and Place.
Civic Addresses
- Civic Addresses should be created for all company buildings regardless of whether a Teams user will be located there.
- Do not create multiple Civic Addresses with the same address. There should only be one Civic Address per physical address.
- The Civic Address portion of an Emergency Address must be validated against the Master Street Address Guide (MSAG) database. Defining an Emergency Address by using the Address Map Search feature in the Teams Admin Center (TAC) is the best way to do this because the address is automatically marked as validated.
- After a Civic Address is added and validated, it cannot be modified. The only way to change a validated address is to add a new Civic Address and its associated Places.
- Each Civic Address must have a Geo-Location (Latitude/Longitude) associated with it. If you define an Emergency Address by using the Address Map Search feature in the Teams Admin Center (TAC), the coordinates are automatically associated with the address.
- Using PowerShell to create a Civic Address does not automatically define a Geo-Location (Latitude/Longitude coordinates). You must include that info in the PowerShell command.
- Using PowerShell to create a Civic Address does not automatically validate the address. If there are any issues with the address it will remain in an invalid state.
- When using PowerShell, a Civic Address is referenced by a unique CivicAddressId, and a DefaultLocationId.
Places
- You can have an unlimited number of Places associated with a Civic Address. Together, a Civic Address and a Place defines an Emergency Address.
- Each Place must have a unique name. You cannot associate multiple Places with the same name to a Civic Address.
- Examples of Places are building numbers, a floor in a building, or an office, suite or room number.
- If you have a lot of Places that need to be associated with a Civic Address, it's best to use PowerShell.
- Network information (subnets, wireless access points, switches, and switch ports) are associated with a Place within a Civic Address.
- When using PowerShell, a Civic Address & Place combination is referenced by a unique LocationID.
Document how your buildings should be divided up into Emergency Addresses:
- Building Numbers or Names on a Building
- Areas or Entrance Names: North, South, East, West
- Floor Numbers
- Room/Office/Area/Cube/Pod Numbers
- Department Names
NOTE
When creating Emergency Addresses, make sure you use names that are physically visible by the emergency responders when they arrive.
When documenting Emergency Addresses for employees and administrators, make sure you use the same vernacular like nicknames and abbreviations.
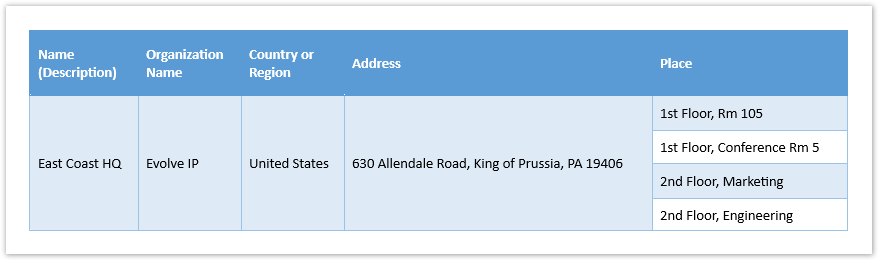
For planning and documentation purposes, you can use the below fictional example that shows multiple Emergency Address entries configured for a company with a single building. The Civic Address will be created by using the Address Map Search feature in the Teams Admin Center (TAC).
NOTE
The above example does not include a Geo-Location (Longitude/Latitude Coordinates), which is required when using PowerShell to configure emergency addresses.
Networking for Emergency Addresses
Network subnets and optional network elements are associated with Emergency Addresses to create Dispatchable Locations, and everything is stored in the Teams Location Information Service (LIS) database. The teams client will use a device's network information to find a match for a dispatchable location in the LIS database.
- Document a list of all Network Subnets used in all buildings and all data centers (if applicable).
- Optionally document a list of the following network elements:
- The BSSID for each Wireless Access Point (WAP)
- The Chassis ID for each network switch
- The Chassis IDs & Port Numbers for all network switch ports
- The required Network Subnets and optional Network Elements will be associated with Emergency Addresses to create Dispatchable Locations.
NOTE
For the Teams client to determine its Dispatchable Location from the LIS database, the user's device must match its public IP address in the Trusted IP Addresses list. Once matched, the Teams client will use the following network items (in order) to match with an Emergency Address in the Teams LIS database:
- Wireless Access Point (BSSID)
- Ethernet Switch (Chassis ID)
- Ethernet Switch Port (Chassis ID & Port Number)
- Network Subnet
The first 3 network items are optional. Network subnets are required.
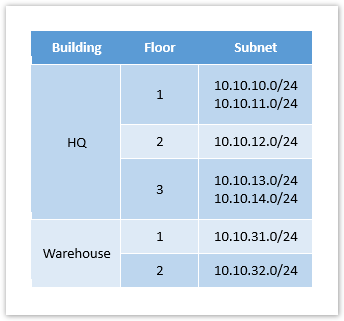
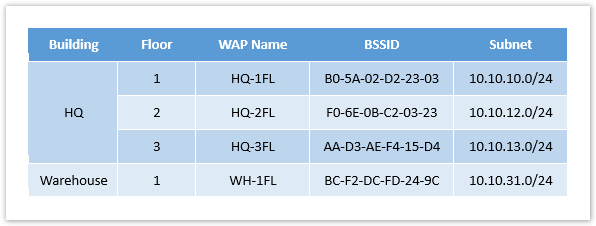
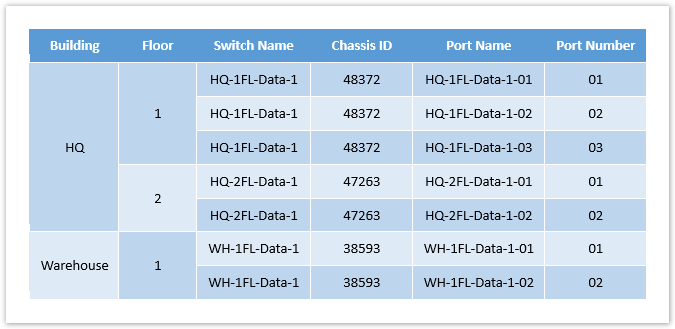
For planning and documentation purposes, you can use the below fictional example that shows the networking for a company with two buildings.
Subnets
Wireless Access Points
The BSSID must be separated with hyphens.
Switch & Switch Ports
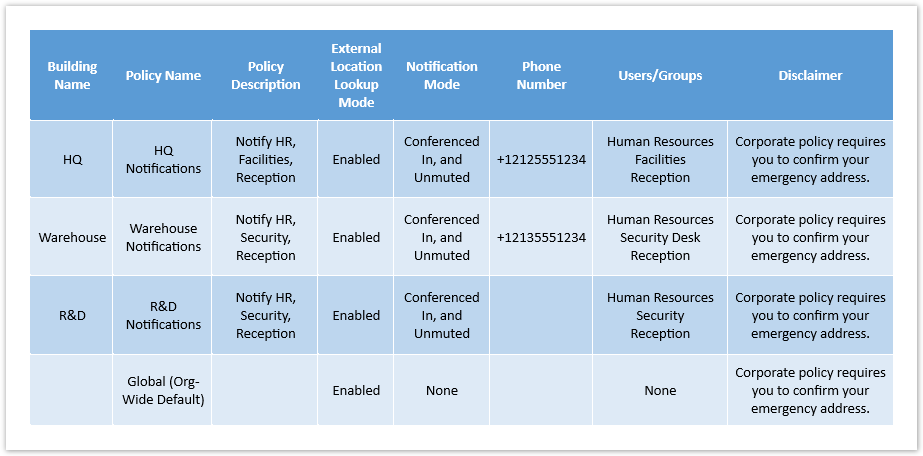
Emergency Calling Policies (Notifications)
In the United States, the Teams Emergency Calling Policies fulfill the notification requirements outlined by Kari's Law. Notifications are used to facilitate building entry by emergency responders, and/or access to secured areas within a building.
- An Emergency Calling Policy should be created for each building, and should be dynamically assigned to a Teams client based on the network location of the Teams client.
- For each building, designate an on-site employee or team of employees that will be notified when an emergency call is made: Human Resources, Security, Facilities, Reception, etc.
- Determine the required procedures to follow when an emergency call is made. Does the team receiving a notification need to follow a checklist?
- If an emergency call is made from a secured location in a building, establish the procedures for emergency responders to get access to that location.
- Determine if notifications should be sent when an employee makes an emergency call while working remote, or working from home.
- There is a maximum of 50 users that can be notified via a direct email address or email distribution groups. A phone number can also be dialed.
An Emergency Calling Policy has the following configuration items:
| Configuration Name | Description |
|---|---|
| External Location Lookup Mode |
|
| Notification Mode |
When one of the Conferenced In modes are chosen, you can enter a PSTN phone number, which will be conferenced in when a Teams user dials an emergency number. However, regardless of the Conferenced In mode the PSTN phone number called can only listen. They cannot unmute to participate in the call. Additionally, you cannot conference in auto attendants or call queues. You can only conference in users, groups, and a PSTN phone number. |
| Emergency Services Disclaimer | Shows a banner to remind Teams users to confirm their emergency location. Max 250 characters. |
| Users & Groups | Determines who will receive a notification. |
For planning and documentation purposes, you can use the below fictional example that shows three Emergency Calling policies configured for a company that has two buildings in the US and one in France. The Global (Org-Wide Default) policy is used for remote or work from home users.
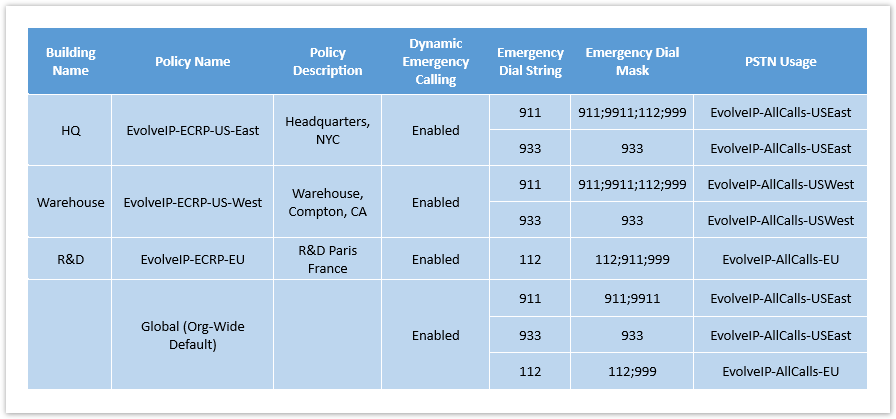
Emergency Call Routing Policies (Direct Routing Only)
When Teams Direct Routing is deployed, you must configure Emergency Call Routing Policies, which have three primary purposes:
- Enable Dynamic Emergency Calling (E911) for direct routing users.
- Define the digits used to call emergency services (E.g.: 911 in the United States, or 112 in Europe).
- Properly route emergency calls to the SBCs of a PSTN provider like Evolve IP.
Additionally:
- In the United States, Dynamic Emergency Calling must be enabled in the policy to comply with Kari's Law.
- An Emergency Call Routing Policy is typically created for each set of SBCs used for direct routing.
- The Global (Org-Wide Default) policy is automatically applied to all direct routing users, and for simple configurations can be modified as needed.
NOTE
Emergency Call Routing Policies only apply to Direct Routing. They do not apply to Microsoft Calling Plans or to Teams Operator Connect.
For Evolve IP customers in the United States, the number of Emergency Call Routing Policies depends on how many buildings you have and their locations in relation to the Evolve IP SBCs in Philadelphia (east) and Las Vegas (west).
| Building Locations | Number of Policies | Action Items |
|---|---|---|
| One Policy |
|
| Two Policies |
|
| Three or More Polices |
|
An Emergency Call Routing Policy has the following configuration items:
| Configuration Name | Description |
|---|---|
| Dynamic Emergency Calling | Determines whether enhanced emergency services are enabled for direct routing users who are assigned the policy. In the United States, this must be enabled to comply with Kari's Law. |
| Emergency Dial String | The phone number sent to the SBCs. For example: 911 in the United States, or 112 in Europe. |
| Emergency Dial Mask | A set of numbers (separated by semi-colons) that a Teams user could dial. For example: 911;9911;112;999 |
| PSTN Usage | Determines the routing to the SBCs that will receive the emergency call. |
NOTE
In the United States, plan to include a dial string and mask for 933, which is used for testing calls to emergency services.
For a list of emergency numbers by country, check this Wikipedia page: https://en.wikipedia.org/wiki/List_of_emergency_telephone_numbers
For planning and documentation purposes, you can use the below fictional example that shows three Emergency Call Routing policies configured for a company that has two buildings in the US and one in France.
- The HQ & Warehouse buildings are configured to dial 911 even when a user from France is onsite in the US, and dials 112.
- The R&D building is configured to dial 112 even when a user from the US is onsite in France, and dials 911.
- The US buildings are configured to accept 933 for testing purposes.
- The Global (Org-Wide Default) policy is used for remote or work from home users.
- Training will be required for all Teams users to dial a country's emergency number when they are working remote or working from home.
- If a US user is working remote in France, they must know to dial 112.
- If a user from France is working remote in the US, they must know to dial 911.
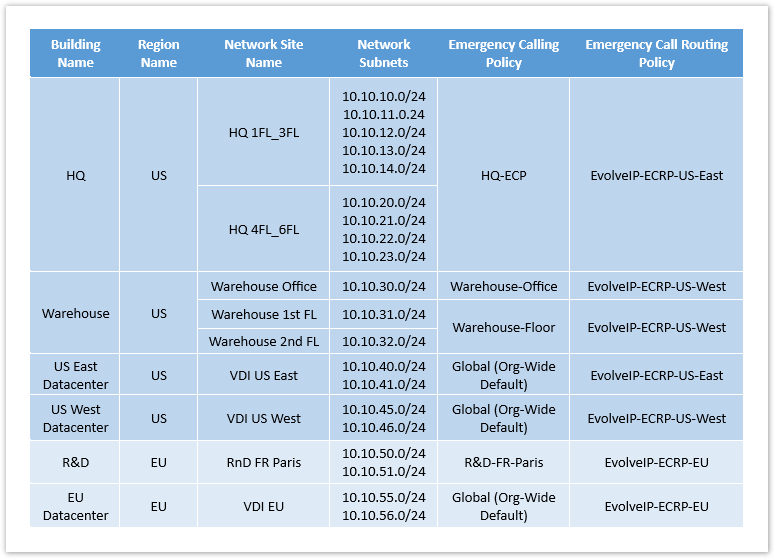
Network Sites
Network Sites are used to determine which of the below Teams policies are assigned to a Teams Client. This is done using corporate network subnets, and is a separate configuration from the Emergency Address network configuration.
- Emergency Calling Policy
- Emergency Call Routing Policy
NOTE
When a user's device is external (or working from home), and not located in a Network Site, the Teams client will will be assigned the Global (Org-Wide Default) policies automatically.
Network Regions & Sites
- Network regions are primarily used for Teams Location Based Routing (LBR) or Teams Local Media Optimization (LMO).
- Regardless of using Teams LBR or LMO, you should create a Network Region for each country in which you have a building.
- A Network Region is created when you create the first Network Site.
- Each Network Site must be associated with a Network Region.
- A Network Site should be created for each building in the organization
- Some buildings may require multiple Network Sites
- Some buildings may be grouped into a single Network Site
- Each Network Site is associated with one or more Network Subnets.
- Each Network Site is associated with an Emergency Calling Policy and an Emergency Call Routing Policy.
Network Subnets
- A Network Subnet is associated with a single Network Site
- A Network Subnet cannot be associated with multiple Network Sites
- A subnet mask must be included
- Both IPv4 & IPv6 subnets are supported
- Super netting and route summarization are not supported
- Do not add VPN subnets to a Network Site
Network Discovery
The process a Teams client uses to select an Emergency Call Policy and an Emergency Call Routing Policy:
- The Teams client checks for a Trusted IP Address.
- If a Trusted IP Address is not found, the Teams client is not on the corporate network, and selects the Global (Org-Wide Default) emergency policies.
- If a Trusted IP Address is found, the Teams client is on the corporate network, and continues.
- The Teams client checks its own IP address to determine its Network Subnet.
- If the Network Subnet is assigned to a Network Site, the Emergency Policies associated with the Network Site are used for emergency calling.
- If the Network Subnet is not assigned to a Network Site, the Teams client selects the Global (Org-Wide Default) emergency policies.
For planning and documentation purposes, you can use the below fictional example that shows Network Site configurations for buildings in the US and France.
- The HQ building has two Network Sites that cover Floors 1-3 and 4-6. Currently they are assigned the same policies, but they may need their own Emergency Calling Policies in the future.
- The Warehouse building has three Network Sites that cover the Office and Floors 1 & 2. They have separate Emergency Calling Policies.
- The R&D building has one Network Site for the whole building.
- The data center buildings have one Network Site for each building. Each data center is in a shared hosting facility, and currently, they are considered remote with no notifications required. However, the company is investigating the possibility of notifying the facility. If this happens, new Emergency Calling Policies will need to be created and assigned to the Network Sites.
Remote or Work from Home
When a device with the Teams client is not connected to the corporate network, it is considered remote. Remote connections could include Teams users working from home, working at a coffee shop, airports, vendor sites, using a hotspot, etc..
- The Teams desktop client on Windows and Mac supports all remote (work from home) location discovery features including manually entering an emergency address.
- Teams on mobile OS (Android & iOS) supports automatic location discovery only. It does not support a Teams user manually entering an emergency address.
- Teams enabled phones do not support any of the remote (work from home) features.
- The remote (work from home) discovery feature is not enabled by default. To turn on remote location discovery, External Location Lookup Mode must be enabled in an Emergency Calling Policy.
- When a Teams client is remote, it is automatically assigned the Global (Org-Wide Default) policy for the following:
- Emergency Calling Policy
- Emergency Call Routing Policy
- Organizations should consider the legal and possible liability of the work from home feature. What if a Teams user enters and verifies the wrong emergency address?
- End-user training and formal documentation is important. When working remotely, it's the the Teams user's responsibility to verify their current emergency address.
Remote Location Discovery Process
- The Teams client queries the back end Teams LIS Database for an emergency address based on its current networking information. If the Teams client is unable to match an emergency address from the LIS Database, the Teams client is considered remote.
- The Teams client queries the local operating system for a location, and a location is returned using the following:
- Global Positioning System (GPS)
- Nearby Wireless Access Points
- Cell Phone Towers
- The device's public IP address
- For Windows 10/11 endpoints, the Location service must be enabled in the privacy settings.
- Depending on the OS and privacy settings, a Teams user may be prompted to approve access to the device's location information.
- The location information returned by the OS is in the form of Geo-Location codes (Longitude/Latitude coordinates)
- The Teams client sends the Geo-Location codes to the Teams backend service, and the service will send back the best emergency address based on the Geo-Location codes.
- The Teams user is prompted to confirm the emergency address, edit the address before confirming it, or enter a new address.
- Once the emergency address is confirmed, it is stored with a reference to the device's current network (Public IP & Local Subnet), and saved in a list of suggested addresses for future use.
- The emergency address is considered validated if the Teams user confirms it without editing the address.
- If the Teams user does not confirm the emergency address, it will be considered invalid.
- If the Teams user edits the emergency address, it will be considered invalid.
- In addition to the above process, the Teams user has the ability to manually enter a new emergency address.
- If the Teams user chooses an address automatically presented by the Teams client from a list, it will be considered validated.
- If the Teams user enters an address manually, interrupting the list of addresses presented by the Teams client, it will be considered invalid.
NOTE
In the United States, when an emergency call is made by a Teams user with an invalid emergency address, the call is routed to the national Emergency Call Response Center (ECRC) for screening. Once the ECRC agent has acquired the caller’s address, the call will be routed to the appropriate Public Safety Answering Point (PSAP) by the ECRC agent.
The location precedence used when an emergency number is dialed:
- A dynamically acquired dispatchable location from the Teams Location Information Service (LIS) database.
- An address the Teams user confirmed, edited, or manually entered, which is associated to the local network the Teams client is connected to.
- An address automatically suggested by the operating system.
- An address a Teams Administrator statically assigns to the Teams user.
Remote Teams Users and Direct Routing
When a Teams client is remote (not on the corporate network), the Teams client is automatically assigned the Global (Org-Wide Default) Emergency Calling & Emergency Call Routing policies. If the remote (work from home) location discovery features are enabled, the Global Emergency Call Routing policy must be properly configured.
For example, a multinational company with remote Teams users working in various countries, must include a country's emergency number in the Global Emergency Call Routing Policy, so that when an emergency number is dialed, it is routed properly via direct routing.
Emergency Calling in Virtual Desktop Infrastructure (VDI)
Virtual desktop environments have their own challenges when it comes to emergency calling because the virtual desktops are hosted in a data center.
- Because the desktops are not local to the user's location, they should be considered remote or work from home devices.
- It's not recommended to include their subnet(s) in the LIS database. In other words, do not associate their subnet(s) with an emergency address.
- If the virtual desktops will be used by Teams users configured for direct routing, you should create one or more Network Sites with subnets.
The below fictional example expands upon the above Network Site configuration, and includes data center locations with virtual desktops:
- The Emergency Calling Policy is set to the Global (Org-Wide Default) policy because notifications will not be configured for the virtual desktops.
- The Emergency Call Routing Policy is set to a policy configured to route emergency calls to the nearest set of SBCs.
Deployment Scenarios
These scenarios and action items assume direct routing has been configured in the Teams environment, and that the remote (work from home) location discovery features will be enabled.
Single Emergency Address (Building)
- Add the public IP Address(es) to the Teams Trusted IP Address list
- Add a Civic Address for the building/office
- Add one or more Places to the Civic Address to create one or more Emergency Addresses
- For each Emergency Address, associate it with one or more of the following network elements to create Dispatchable Locations:
- Network Subnets (required)
- Wireless Access Points (optional)
- Network Switches and Ports (optional)
- Edit the Global (Org-Wide Default) Emergency Calling Policy
- Enable External Lookup Mode (for remote or work from home)
- Create a new Emergency Calling Policy
- Enable External Lookup Mode (for remote or work from home)
- Configure Notification Settings for the building
- Edit the Global (Org-Wide Default) Emergency Call Routing Policy
- Enable Dynamic Emergency Calling
- Configure the Emergency Dial Strings, Masks and PSTN Usages (routing) for remote or work from home
- Create a new Emergency Call Routing Policy
- Enable Dynamic Emergency Calling
- Add entries for the Emergency Dial Strings, Masks, and PSTN Usages (routing) for internal, corporate networks
- Create the Network Topology
- Add a Network Region and a Network Site
- Add one or more Subnets to the Network Site
- Associate the Network Site with the new Emergency Calling Policy
- Associate the Network Site with the new Emergency Call Routing Policy
Multiple Emergency Addresses (Buildings)
- Add the public IP Address(es) to the Teams Trusted IP Address list
- For each office/building, add a Civic Address
- For each Civic Address, add one or more Places to create one or more Emergency Addresses
- For each Emergency Address, associate it with one or more of the following network elements to create Dispatchable Locations:
- Network Subnets (required)
- Wireless Access Points (optional)
- Network Switches and Ports (optional)
- Edit the Global (Org-Wide Default) Emergency Calling Policy
- Enable External Lookup Mode (for remote or work from home)
- For each building create an Emergency Calling Policy
- Enable External Lookup Mode (for remote or work from home)
- Configure Notification Settings for the building
- Edit the Global (Org-Wide Default) Emergency Call Routing Policy
- Enable Dynamic Emergency Calling
- Configure the Emergency Dial Strings, Masks and PSTN Usages (routing) for remote or work from home
- For each US region with a building, create a new Emergency Call Routing Policy
- Enable Dynamic Emergency Calling
- Add entries for the Emergency Dial Strings, Masks, and PSTN Usages (routing) for internal, corporate networks
- Create the Network Topology
- Add a Network Region and create one or more Network Sites
- Add one or more Subnets to each Network Site
- Associate each Network Site with their respective policies:
- Emergency Calling Policy
- Emergency Call Routing Policy
Multinational with Multiple Emergency Addresses (Buildings)
- Add the public IP Address(es) to the Teams Trusted IP Address list
- For each office/building, add a Civic Address
- For each Civic Address, add one or more Places to create one or more Emergency Addresses
- For each Emergency Address, associate it with one or more of the following network elements to create Dispatchable Locations:
- Network Subnets (required)
- Wireless Access Points (optional)
- Network Switches and Ports (optional)
- Edit the Global (Org-Wide Default) Emergency Calling Policy
- Enable External Lookup Mode (for remote or work from home)
- For each building create an Emergency Calling Policy
- Enable External Lookup Mode (for remote or work from home)
- Configure Notification Settings for the building
- Edit the Global (Org-Wide Default) Emergency Call Routing Policy
- Enable Dynamic Emergency Calling
- Configure the Emergency Dial Strings, Masks and PSTN Usages (routing) for remote or work from home
- For each US region with a building, create a new Emergency Call Routing Policy
- Enable Dynamic Emergency Calling
- Add entries for the Emergency Dial Strings, Masks, and PSTN Usages (routing) for internal, corporate networks
- Create the Network Topology
- Add one or more Network Regions (e.g a region for each country)
- Create one or more Network Sites for each Network Region
- Add one or more Subnets to each Network Site
- Associate each Network Site with their respective policies:
- Emergency Calling Policy
- Emergency Call Routing Policy