TABLE OF CONTENTS
Overview
This guide discusses the most common tasks and tools you can use to manage your Workspace ONE MDM environment. For a complete administrator guide discussing all features of AirWatch MDM please the Additional Help section at the bottom of this document.
Login
Open your web browser and navigate to https://cn700.awmdm.com. Your username and password will be provided by Evolve IP.
Main Menu
The Main Menu contains all options and features to govern your environment. The following options in the main menu relate to MDM and are relevant to your environment.
Ensure that all aspects of a basic successful deployment are established. Getting Started is organized to reflect only those modules within an AirWatch Console deployment that you are interested in. Getting Started produces an on-boarding experience that is more tailored to your actual configuration.
Access an overview of common aspects of devices in your fleet, including compliance status, ownership type breakdown, last seen, platform type, and enrollment type. Swap views according to your own preferences including full Dashboard, list view, and detail view. Access additional tabs, including all current profiles, enrollment status, Notification, Wipe Protection settings, compliance policies, certificates, product provisioning, and printer management.
Survey and manage users and administrators involved with your MDM deployment. Access and manage user groups, roles, batch status, and settings associated with your users. Also, access and manage admin groups, roles, system activity, and settings associated with your administrators.
Manage structures, types and statuses related to organization groups, smart groups, app groups, user groups, and Admin Groups. Configure entire system settings or access settings related to all Main Menu options.
options.
Supported Devices
MDM supports the following devices and operating systems.
- Android 4.0+
- Apple iOS 7.0+
- Chrome OS (latest)
Please see an updated list right here on the VMware Knowledge Base → https://docs.vmware.com/en/VMware-Workspace-ONE-UEM/1908/WS1_Assist/GUID-AWT-RMV4-SUPPORTEDPLATFORMS.html
Creating Administrative Users
If you wish to add additional administrative users to your organization, you can do so easily by following these instructions.
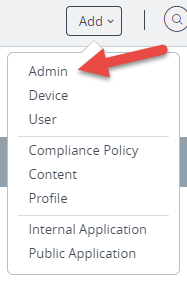
- Click the “Add” button near the top-right hand corner of the page, and select Admin
- You will see the Add/Edit Admin window, with Basic, Details, Roles, API, and Notes tabs.
- Under the Basic tab, set the user to Basic and fill out the rest of the required fields as appropriate.
- If you wish to set up Two-Factor Authentication Method or Notifications, then click the drop-down arrow next to those respective options and fill out the forms as appropriate.
- If you wish to fill out the Details tab with more information about the user, you may do so
- Click the Roles tab.
- Click the “Select Organization Group” field and select your company name.
- Click the “Role” field and select the appropriate role. Choose Console Administrator if you want the user to have total administrative capabilities. You can find out more about the additional roles in the Mobile Device Management Guide.
- Click Save.
Email enrollment setup
During enrollment your users will be asked to authenticate using their email account or with a Server ID. The more user-friendly option is by using their email account. You can add your company’s email domain to MDM to allow this.
- Go To Groups & Settings > All Settings > Devices & Users > General > Enrollment
- Click the Add Email Domain button
a. Organization Group: This should be prepopulated with your organization
b. Business email Domain: Enter in an email address with the email domain that you want to include
c. Confirmation email address: Retype the email address
d. Click SAVE
After this is completed your users will be able to enroll their devices using their email address.
Adding Users and Devices
The first thing you will want to do is get your users’ devices enrolled into your MDM environment. The simplest way to add devices is to add the actual user of that device. The user will then receive an email invitation to enroll their device. After the user has followed the steps for enrollment, their device will show in the AirWatch Console.
Apple Push Notification Service (APNs) for MDM
If you plan on managing iOS devices, then you will need an Apple Push Notification service (APNs) certificate so that iOS device users can enroll their devices. You will need an Apple ID to obtain this certificate. Please follow these instructions to obtain and install it.
- Get your Apple ID
- In the AirWatch Console, go to Groups & Settings > All Settings > Devices & Users > Apple > APNs For MDM
- Click the blue Generate New Certificate button and follow the instructions to complete the process.
Manually Adding Users
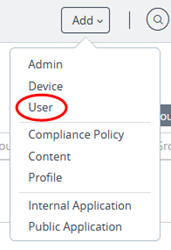
- Near the top right-hand corner of the web page, click the Add drop-down menu and choose User
- Under the General tab, fill out the following fields with appropriate end user information:
- Username
- Password
- Confirm Password
- Full Name
- Display Name
- E-mail Address
- Under General tab > Enrollment:
- Verify the Enrollment Organization Group is set correctly
- Set Allow user to enroll into additional Organization Groups to "Disabled"
- Set the User Role to "Basic Access"
- Leave General tab > Notification as is. This will send out an email to the user with instructions to enroll.
- Click Save
Batch Import
- Navigate to Accounts > Users > List View. Then select the Add and select Batch Import.
- Enter the basic information including a Batch Name and Batch Description in the AirWatch Console.
- Select the applicable batch type from the Batch Type drop-down menu.
- Select and download the template that best matches the kind of batch import you are making.
- Blacklisted Devices – Import a list of known, non-compliant devices by IMEI, Serial Number, or UDID. Blacklisted devices are not allowed to enroll. If a blacklisted device attempts to enroll, it is automatically blocked.
- Whitelisted Devices – Import pre-approved devices by IMEI, Serial Number, or UDID. Use this import a list of known, trusted devices. The ownership and group ID associated to this device is automatically applied to the device during enrollment.
- User / Device – Choose between a Simple and an Advanced CSV template. The simple template features only the most often-used options and the Advanced template features the full, unabridged compliment of options.
- Open the CSV file, which consists of a CSV (comma-separated values) file that is populated with a single row completed with a sample device data. The CSV file features several columns corresponding to the setting that display on the Add / Edit User page. The GroupID column corresponds to the Enrollment Organization Group setting on the Add / Edit User page. You can confirm whether or not users are part of the enrollment organization group (OG).
- Navigate to Groups & Settings > All Settings > Devices & Users > General > Enrollment and check the Grouping
- If the Group ID Assignment Mode is set to Default, then your users are part of the enrollment OG.
- For a directory-based enrollment, the Security Type for each user must be Directory.
- Enter data for your organization's users, including device information (if applicable) and save the file.
- Return to the Batch Import page and select Choose File to locate and upload the CSV file that you had previously downloaded and filled out.
- Select Save
Enrollment
After adding users in the AirWatch Console, users will receive an email that invites them to enroll their device. The link will direct them to download and install steps specific to their devices. For example, if the user has an Android or Chromebook device, the link will direct users to the Google Play store. If the user has an iOS device, it will direct them to the Apple App Store. After following the steps for enrolling, an AirWatch agent application will be installed on their device as well as a Profile.
Android uses may also receive a notification to install com.airwatch.rm.agent. This additional agent allows administrators to remotely control these devices via the Remote Management feature. You may direct your end-users to Skip or Install this agent. Please note that Remote Management is a feature that Evolve IP does not support.
The Device List View
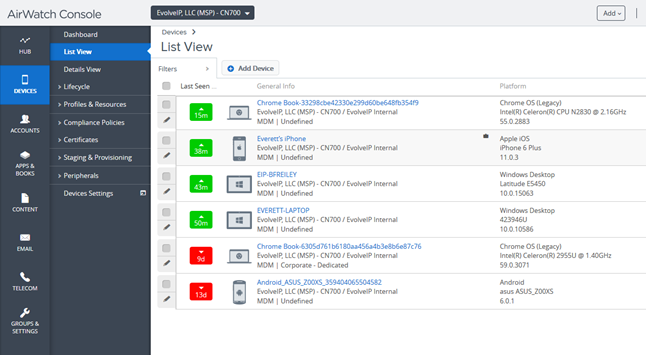
Once enrolled, your users’ devices will show in the Device List View. To see this list, go to Devices > List View. From this list you can view your entire device fleet, drill down on device names to see their details, launch Remote Management sessions for supported devices, add Tags, and more. You can also filter this list by various criteria.
GPS tracking
GPS settings need to be set up in multiple areas of the MDM console in order for GPS tracking to work properly.
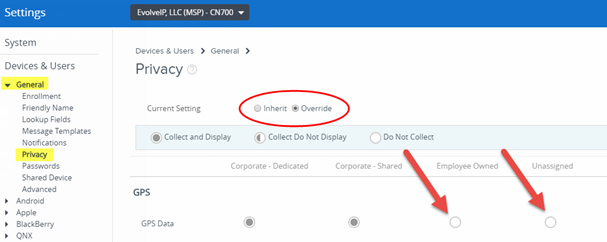
- Navigate to Groups & Settings > All Settings > Devices & Users > General > Privacy
- Set Current Setting to Override
- Here you will see the GPS Data By default, Corporate Dedicated and Corporate – Shared are set to “Collect and Display”. If you wish to apply GPS tracking to Employee Owned and Unassigned devices too, then set them to “Collect and Display” as well.
- Click Save (at the bottom of the page).
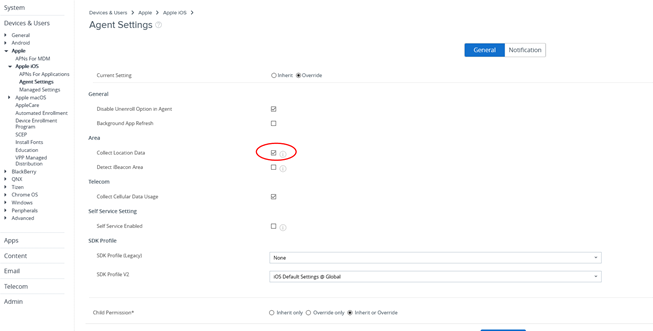
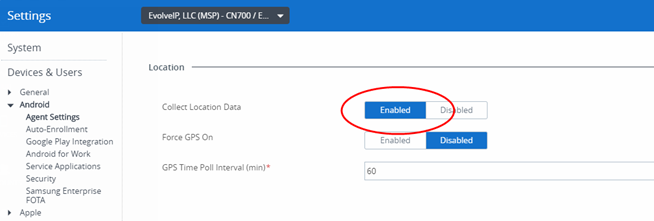
You will also need to enable “Collect Location Data” on both iOS and Android devices.
iOS
Go to Apple/Apple iOS/Agent Settings and you will see Collect Location Data checkbox. Checkmark the box to enable the feature.
Android
Go to Android > Agent Settings and you will see Collect Location Data. Choose “Enabled.”
After enabling these GPS features the user will get a request for authorization to collect location information. If the user authorizes this, GPS tracking for that device will begin working and will show under the device’s Location tab.
Managing devices with Profiles: Restricting the camera on iOS devices
After enrollment, your users’ devices will be managed by a default device profile. This initial profile imposes no restrictions on devices. If you wish to apply restrictions to your device fleet, you can do so with Profiles.
Here is a brief list of features and applications you can restrict or govern:
Camera | Device and Enterprise Wipes |
Profile example: Restricting the camera on iOS devices
The below example shows how to restrict the use of the camera on iOS devices using a custom Profile.
- Go to Devices > Profiles & Resources > Profiles
- Click the Add drop-down menu and select Add Profile
- Choose iOS
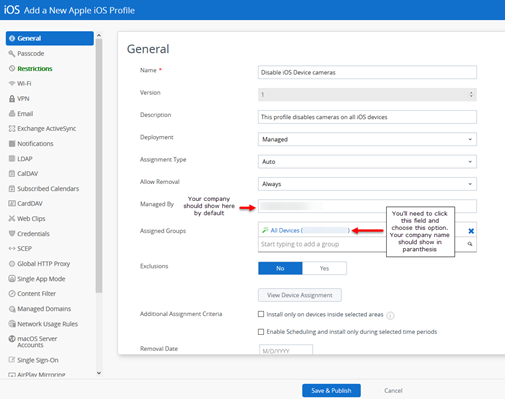
- The General payload form will show. Please fill it out as per the below screenshot.
- Click the Restrictions option on the left of the screen, and then the Configure You will see a long list of functions and features that you can manage. The first option should be “Allow use of camera.”
- Uncheck the box next to “Allow use of camera” and click the Save & Publish
- The “View Device Assignment” window will show, listing all the iOS devices in your fleet that will be affected by this change. Click the Publish
- The Profiles screen will now show with the Profile that you just created.
This new Profile should push almost immediately to iOS devices in your fleet that are enrolled and active with an internet connection. They will push to inactive, enrolled iOS devices the next time they are on the internet.
Updating Profiles: The Add Version feature
This section discusses how to make changes to your custom Profiles. AirWatch uses versioning to track changes to profiles, so updating profiles uses a feature called Add Version.
- Click the edit icon next to the profile that you want to update. You can also simply click on the Profile name.
- Click the Add Version *Note: After clicking, this button will be replaced by the Save & Publish button. Do not click it just yet.
- Make your changes and then click Save & Publish.
Your changes should push almost immediately to iOS devices in your fleet that are enrolled and active with an internet connection. They will push to inactive, enrolled iOS devices the next time they are on the internet.
Enterprise Wipe and Device Wipe
This section discusses the differences between Device and Enterprise Wipe as well as preventative measures you can take to protect against accidental wipes initiated by employees and admins.
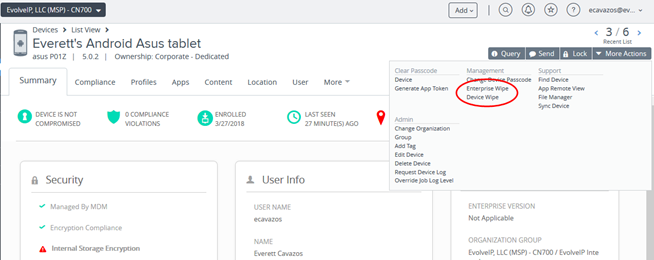
Enterprise Wipe: This will wipe a device of all company-related information and the AirWatch agent. The types of data that is removed are configured within the AirWatch Console.
Device Wipe: A Device Wipe completely wipes a device and sets it back to default as if you pulled the device new out of its box.
Both options are available under More Actions > Management in the Device Profile page.
How to prevent user-initiated Device Wipes
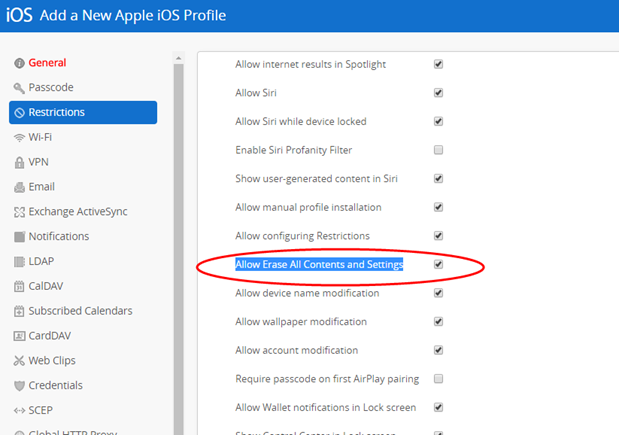
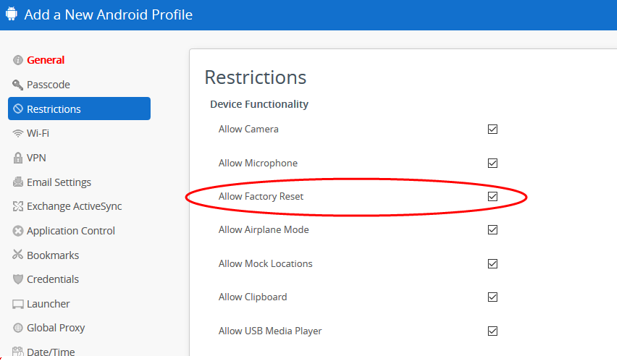
You can adjust the following restrictions when setting up profiles for iOS and Android. This will prevent users from completely erasing their devices back to factory default.
iOS
Android
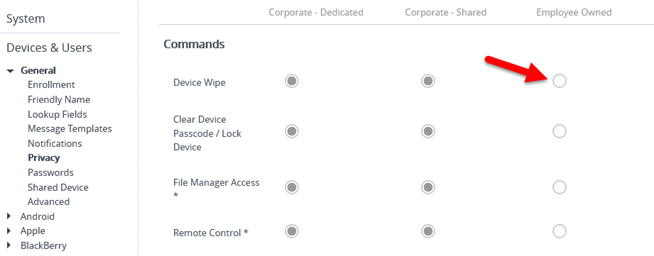
Disable admin-initiated Device Wipe for BYOD Devices
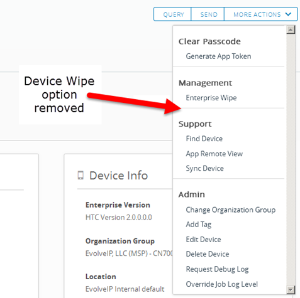
Please follow these instructions If you wish to prevent other MDM Administrators from performing device wipes on BYOD Devices. This will remove the “Device Wipe” option from the More Actions menu located in devices’ profile screens.
- Navigate to Devices > Device Settings > Devices & Users > General > Privacy.
- Scroll down to the Commands section and find the Employee Owned
- Set the Device Wipe option to Prevent and select Save.
The Device Wipe command will be removed from the More Actions menu as per this screenshot.
Reports & Analytics
AirWatch has extensive reporting and event logging capabilities that provide administrators with actionable, result-driven statistics about device fleets. You can use these pre-defined reports or create custom reports based on specific devices, user groups, date ranges, or file preferences. Reports can be viewed by navigating to the Reports page at Hub > Reports & Analytics > Reports > List View. Added reports are accessible from the My Reports tab at the top of the Reports page for quick access.
Some examples of reports are:
Admin Login History | Content Details by Device | Count of Active Devices |
Device Battery Log | Device Inventory | Device Wipe Log |
Devices with User Details | Profile Configuration Details | Profile Details by Device |
More features
How to whitelist and blacklist apps
Apps & Books > Applications > Application Settings > App Groups > Add Group
Additional help
For a comprehensive guide to all MDM features please see the VMware AirWatch Mobile Device Management Guide:
https://resources.air-watch.com/view/4mrhbs2b7kygc2b5fkph/en


