Overview
This procedure will guide you through setting up Mobile Email Management in AirWatch MDM for Office 365. The end result will keep unmanaged devices from retrieving company email.
Configuring MEM deployment for use with Office 365
Office 365
You will need to create a global administrator account in Office 365 first, e.g. airwatchmdm@yourcompany.com. This account will only be used for Airwatch MDM to speak with O365. It will not need a license assigned to it.
AirWatch MDM
- Go to Email > Dashboard
- Click on Click here to configure MEM
- Click the blue Configure button

- Under the
 section
- Set Deployment Model to Direct
- Set the Email Type to Exchange
- Set the Exchange Version to Exchange Office 365 and click Next
- Under the
 section
- Set the Friendly Name to something familiar, such as O365 MEM
- PowerShell URL to "https://outlook.office365.com/powershell"
- Ignore SSL errors between AirWatch and Exchange server: Disable
- VMware Enterprise Systems Connector configuration to use should be set to Current Organization Group
- Use Service Account Credentials to Disable
- Set Authentication Type: Basic
- Admin User Name: enter the Office 365 Global Administrator email address
- Admin Password: enter the Global Administrator password
- One-time sync after configuration: Disable
- Filter sync results: None
- Click Next
- Under the
 section
- Click Add to add the appropriate profiles. E.g. if the organization is comprised of both iPhones and Android devices, then you would add two profiles, one for iOS and one for Android.
- Mail Client: Native Mail Client
- Action: Create New Profile
- Click Next
- The
 screen will summarize the details. Click Finish
 - Click the X to close the Settings screen
Profile
Now we have to correctly finish setting up the profiles.
- Go to Devices > Profiles
- Click the device profile name
- Click the
 button
 - Click Exchange ActiveSync
- Change the User field to {EmailAddress} by clicking the plus icon

- There are additional settings that you can set, such as Restrictions on Attachments, Allowing email forwarding, etc.
- Click

- Repeat this process for additional Profiles
We have found that the device profiles do not push to the devices after clicking Save & Publish. If this happens you will need to manually push the profiles to those devices.
- Go to Devices > List View
- Click on the device name and click Profiles
- Click the radio button next to the profile name and click Install

Compliance Policy
The last step is to manage and run the compliance policy at Email > Compliance Policies
- Go to Email > Compliance Policies
- Make the changes that you require. For example, if you only want Managed Devices to receive company email, then click the toggle switch next to the Managed Device policy.
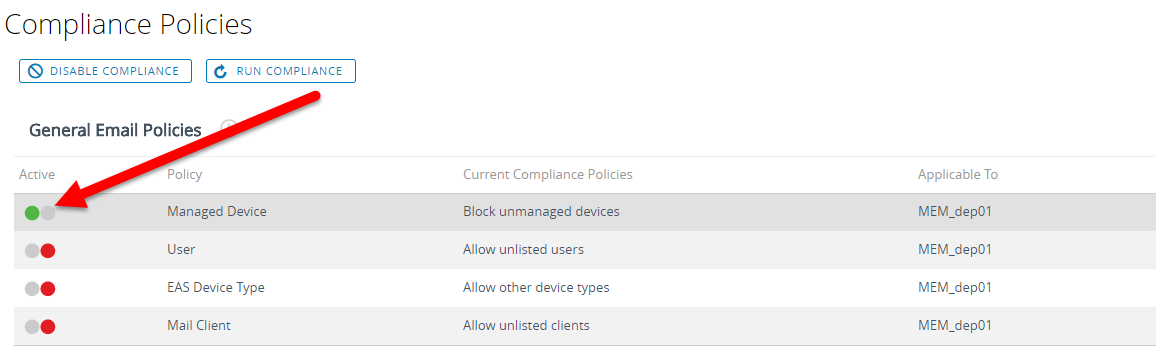
- After you have made your changes click Run Compliance
- Click on List View. The device should now show in this list.
You will need to Run Compliance whenever you make any changes to the compliance policy. If changes aren't taking you can also Sync Mailboxes by navigating List View, clicking the checkbox next to the device name, then selecting Actions/Sync Mailboxes.