Select the location you wish to view and edit. Select Telephony Setup and Auto Attendant to bring up Auto Attendants for that specific location.
The following information can be found on the Auto Attendant landing page:
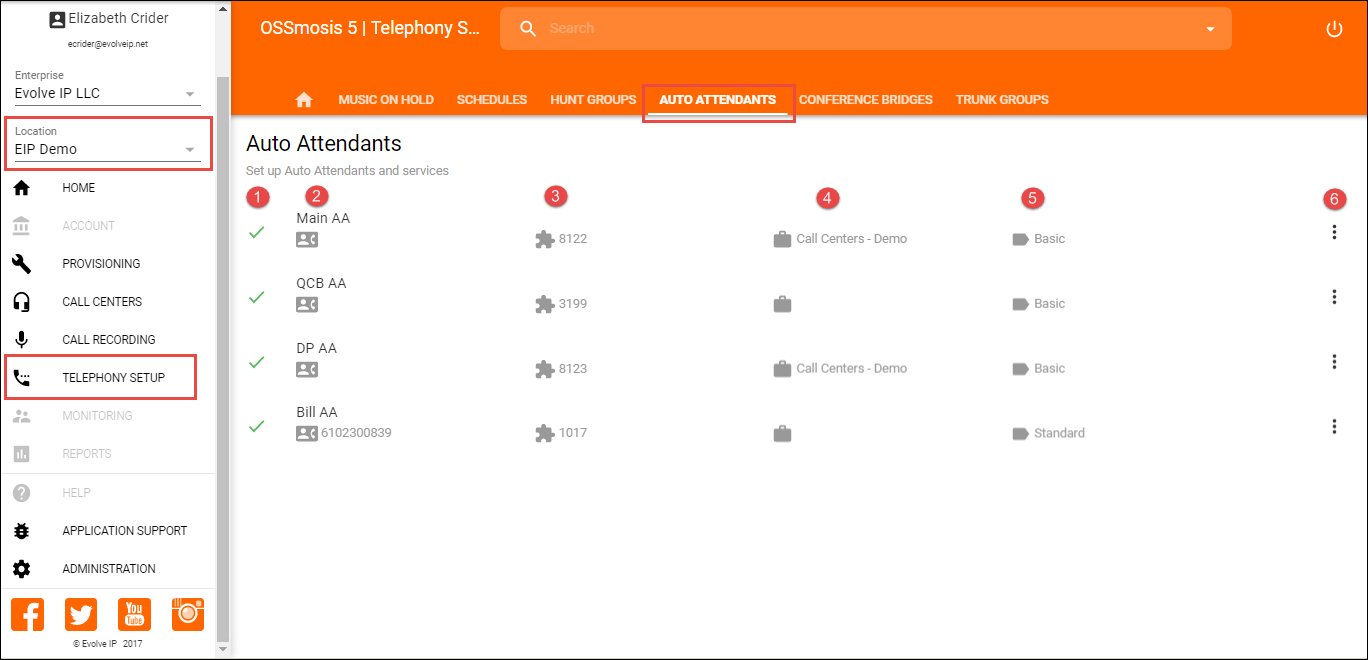
- Active/Inactive – A green check mark indicates the Auto Attendant is currently active. A red X indicates the Auto Attendant is currently inactive.
- Name and DID assigned to the Auto Attendant – Note: An Auto Attendant may not have a DID assigned if it is extension only.
- Extension Assigned to Auto Attendant – Note: An extension is not mandatory if a DID has been assigned to the hunt group.
- Department Assigned to the Auto Attendant – Note: It is not required to assign a Department to an Auto Attendant. A Department icon with no name attached indicates no Department has been assigned.
- Auto Attendant Type – This will show the auto attendant type: Basic or Standard. The type of Auto Attendant that is purchased will determine the number of menus available for administrators to manage.
- Additional options – Selecting the options icon allows Admins to manage the Auto Attendant settings, menus and deactivate/activate the Auto Attendant.
Edit Standard Auto Attendant Settings
Edit settings allows Admins to manage the general settings of a Standard Auto Attendant. The following settings can be edited within this page:
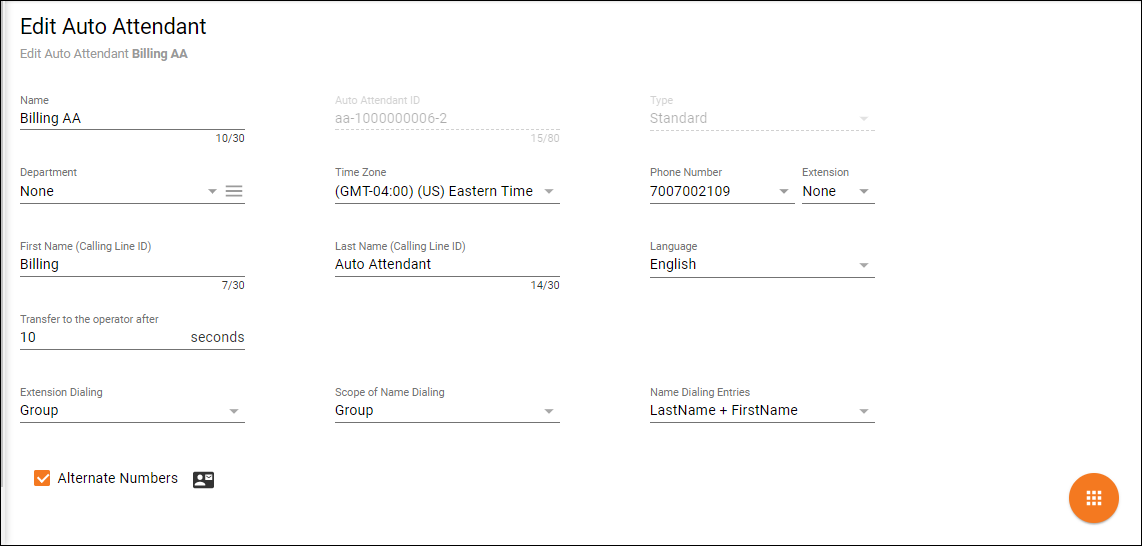
- Auto Attendant Name
- Department – Determine if the hunt group will apply to a specific department within the company. A Department is not a mandatory auto attendant setting.
- Time Zone
- Phone Number/Extension – The phone number and/or extension of the Auto Attendant
- First and Last Name Calling Line ID – The calling line ID is presented to internal users when receiving a call from the Auto Attendant.
- Language
- Transfer to Operator After (x) Seconds – This option applies if the caller does not select an menu option in the specified time.
- Enterprise Dialing – Scope of extension dialing used to determine whether the auto attendant can direct calls to users. Choose from the following categories:
- Enterprise – multiple locations
- Group – one location
- Department – specific area
- Scope of Name Dialing – Scope of name dialing used to determine where the auto attendant can direct calls to users. Choose from the following categories:
- Enterprise – multiple locations
- Group – one location
- Department – specific area
- Name Dialing Entries – Ability to locate a user by name
- LastName + FirstName
- LastName + FirstName or FirstName + LastName
- Apply Alternate Numbers – Allows customers to dial alternate numbers and still reach the Auto Attendant
Edit Standard Auto Attendant Menus
To edit the Business, After Hours, Holiday or Sub menus, select the Additional Options icon on the main landing page and select Menus.
Business Hours Menu
Business Hours menu allows Admins to configure the greeting and menu options for their normal business hours of operation.
Business Hours Greeting
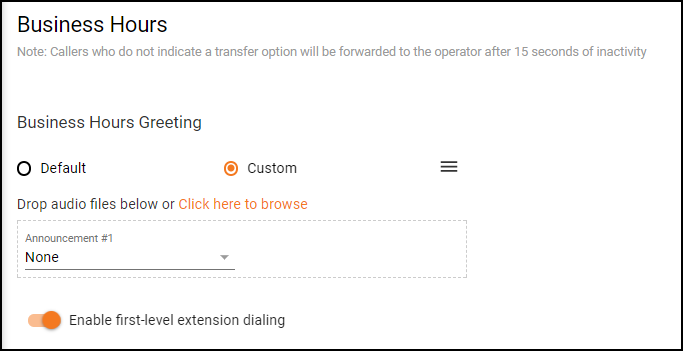
- Default – System generated default message
- Custom – Select custom to add a custom WAV/MP3 file for the business hour greeting
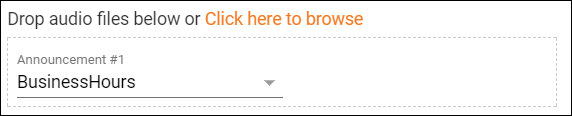
- Drop Audio Files Below – Drag and drop the file in the Announcement box to add a custom message
- Click Here to Browse – Browse and upload a custom message
- Announcement #1 – The drop down will show all the available custom messages that have been added to the announcement repository and are available to apply to the Business Hour Greeting
- Click Here to learn how to add a custom announcement
Business Hours Action Options
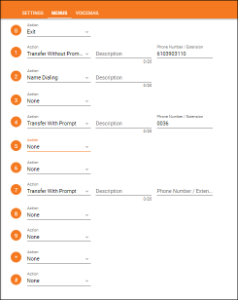
Admins have the ability to change the menu options and manage the action, description and where calls are transferred to, if applicable. The greeting played to customers should match the order and destination of the AA menu. If the order and destination of the menu changes, a new custom greeting should be added. Below are a list of all Actions available when setting up an Auto Attendant.
Step 1: Pick an Action:
- None – No action will be taken if selected by caller
- Transfer with Prompt – Prompt “Please wait while your call is transferred” and call is transferred to the specified number/extension
- Add a Description for the action – Ex. Sales, Billing
- Enter in the Phone Number/Extension the caller will be transferred if selected
- Transfer Without Prompt – No prompt is played and call is transferred to the specified number
- Add a Description for the action – Ex. Sales, Billing
- Enter in the Phone Number/Extension the caller will be transferred if selected
- Transfer to Operator – Prompt: “Please wait while your call is transferred to the operator” and call is transferred to the specified number
- Add a Description for the action – Ex. Sales, Billing
- Enter in the Phone Number/Extension the caller will be transferred if selected
- Name Dialing – Access to Name Dialing
- Add a Description for the Action – Ex. Department, Enterprise, Group
- Extension Dialing – Access to Extension Dialing
- Add a Description for the Action – Ex. Department, Enterprise, Group
- Transfer to Mailbox – Caller will be transferred to the Auto Attendant mailbox if voicemail has been enabled
- Transfer to Submenu – Caller will be transferred to a submenu of the business hours auto attendant. The submenu will present the caller with a different greeting and transfer options than the business hour menu or menu where the call was transferred from. Businesses might use a submenu when they want to present callers with a sub-level of transfer options within a department. Example:
- Press 1 for Sales
- Pressing 1 takes them to a submenu
- Press 1 for HPBX
- Press 2 for Call Center
- Press 3 for Compute
- Play Announcement – Announcement is played to caller
- Add a Description of the Announcement
- Select the Announcement from the Announcement drop down menu
- Repeat Menu – Menu greeting is replayed
- Exit – Call is released
Step 2: Add a Description (if applicable). The description is typically where the call is being transferred. Example: Description: Sales – For the Sale Department
Step 3: Enter in the phone number or extension where the caller will be transferred.
Step 4: Save Menu

After Hours Menu
The After Hours menu allows Admins to configure the greeting and menu options presented to customers when they call outside of their normal business hours of operation – after hours. A business hours time schedule is applied in the After Hours Menu. The After Hours greeting will play outside of the hours defined by the time schedule
After Hours Greeting
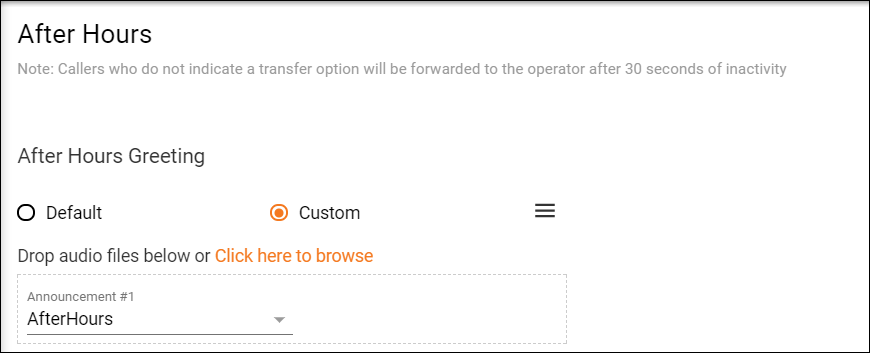
- Default – System generated default message
- Custom – Select custom to add a custom WAV/MP3 file for the after hours greeting
- Drop Audio Files Below – Drag and drop the file in the Announcement box to add a custom message
- Click Here to Browse – Browse and upload a custom message
- Announcement #1 – The drop down will show all the available custom messages that have been added to the announcement repository and are available to apply to the After Hours Greeting
- Click Here to learn how to add a custom announcement
Business Hours Time Schedule
A time schedule must first be created in Schedules under Telephony Setup to add a time schedule in the After Hours menu. To learn how to create a Time Schedule, Click Here. Once a time schedule has been created, select the schedule from the Business Hours drop down:

After Hours Action Options
The After Hour Action options are identical to what is available within the Business Hour menu. Follow the steps found in the Business Hours Action Options to manage the After Hours menu.
Holiday Menu
The Holiday menu allows Admins to configure a separate greeting and menu options during the holidays.
Holiday Greeting
The Holiday Greeting will only play when a holiday is recognized through the holiday schedule. If an enterprise chooses to play a generic holiday greeting, they can leave the greeting in place all year. If they would like their greeting to be specific to each holiday, they will want to record and add a new greeting for each holiday in the announcement drop down.
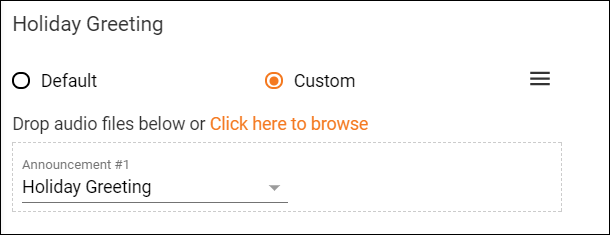
- Default – System generated default message
- Custom – Select custom to add a custom WAV/MP3 file for the Holiday Greeting
- Drop Audio Files Below – Drag and drop the file in the Announcement box to add a custom message
- Click Here to Browse – Browse and upload a custom message
- Announcement #1 – The drop down will show all the available custom messages that have been added to the announcement repository and are available to apply to the Holiday Greeting
- Click Here to learn how to add a custom announcement
Holiday Schedule
A holiday time schedule must be created in Schedules under Telephony Setup first, before adding a holiday time schedule in the Holiday menu. To learn how to create a Holiday Schedule, Click Here Once a holiday time schedule has been created, select the schedule from the Holiday Schedule drop down:

Holiday Action Options
The Holiday Action options are identical to what is available within the Business Hour menu. Follow the steps found in the Business Hours Action Options to manage the Holiday Menu.
Submenus
Submenus are used for creating advanced call flows with multiple menu tier options within the Auto Attendants Business, After Hours and Holiday menus.
Adding a Submenu
Admins can choose to create a Submenu within the Business, After Hours or Holiday menus or create a Submenu as a standalone to be added later.
Option 1:
When Transfer to Submenu is selected as an Action Option within a Business, After Hours or Holiday menu, the Admin will fill in the submenu description and select the submenu from the Submenu Drop Down. If the submenu is not created, the Admin can select the Add icon to add a new submenu.

When selected, a Create New Submenu page will open. Once the submenu has been created and saved, you will be taken back to the previous menu page to add the new submenu into the Submenu Drop Down.

Option 2:
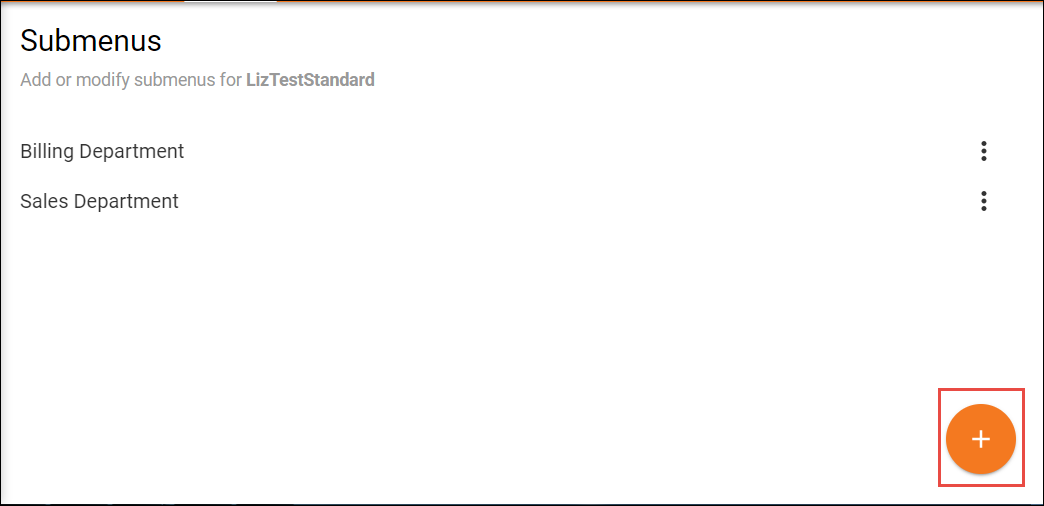
On the Auto Attendant Menu main page, select View under Submenu.
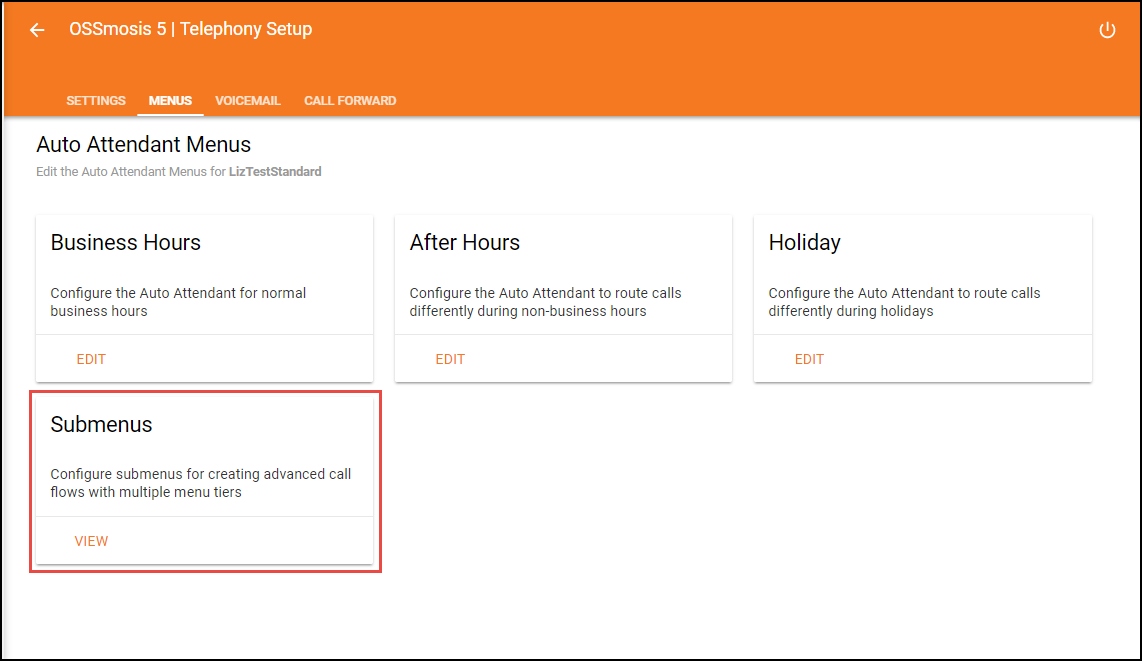
A Submenu landing page will open showing all existing submenus. Select the Add icon to add a new submenu.
Creating a New Submenu
When creating a new submenu the following information is needed:
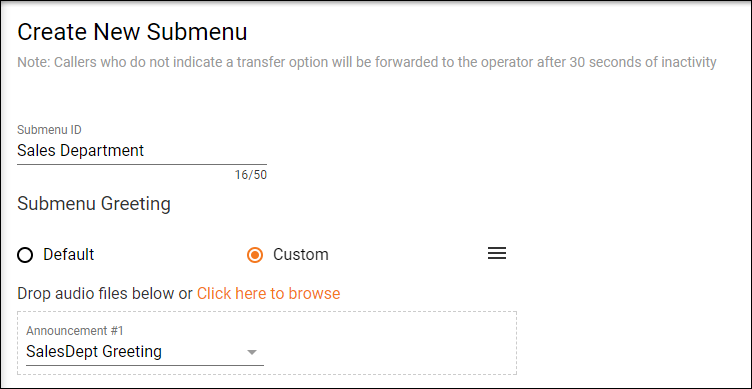
- Submenu ID – Name of the Submenu
- Submenu Greeting options:
- Default – System generated default message
- Custom – Select custom to add a custom WAV/MP3 file for the Submenu Greeting
- Drop Audio Files Below – Drag and drop the file in the Announcement box to add a custom message
- Click Here to Browse – Browse and upload a custom message
- Announcement #1 – The drop down will show all the available custom messages that have been added to the announcement repository and are available to apply to the Submenu Greeting
- Click Here to learn how to add a custom announcement
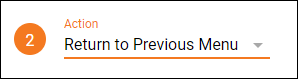
Submenu Action Options
The Submenu Action options are identical to what is available within the Business Hour Action Options, with one addition of Return to Previous menu. This option allows for the caller to return to the top level Business, After Hours or Holiday menu.
Follow the steps found in the Business Hours Action Options to manage the Submenu