In This Article
Overview
Portal Announcements are used to send a scheduled message to all Clearlogin users in their dashboard. When a scheduled announcement goes live, the Notification Bell icon will signify an announcement is available to view.
![]()
Some things to note about portal announcements:
- Once an announcement goes live, making changes to the announcement will not reset the announcement's status in the user dashboard.
- All users have the ability to mark an announcement as Read. Once the announcement is marked Read, it cannot be changed back to Unread.
- In an announcement's configuration, you can make the announcement sticky by not allowing it to be deleted.
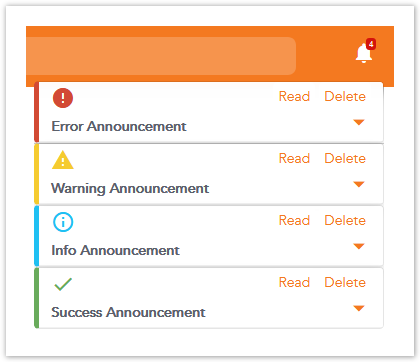
- The announcement type determines how the announcement is presented to the users with different icons and colors.
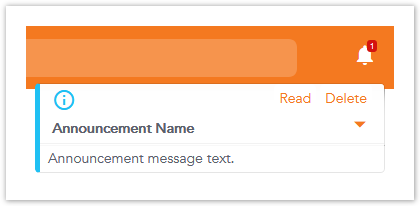
- When selecting the Notification Bell icon only the announcement name is shown. To view the message, a user has to click the arrow icon to view the message text.
- One or more portal announcements can be active at the same time. When multiple announcements are active, they are stacked as a list.
Configuration Steps
- Sign into the Clearlogin Admin Console: https://admin.clearlogin.com
- In the left navigation bar, browse to: Settings > Announcements
- Click the Add New Announcement button, or the Edit icon to edit an existing announcement.
Existing announcements that are inactive or have expired will be listed in red. Existing announcements that are active will be listed in green.
| Setting Name | Description |
|---|---|
| Name | This is the name/identifier for the announcement. This name is shown to the users in the announcement header. There is a 40 character limit for the announcement name. |
| Description | This is the message text for the announcement. To view the message, a user has to click the arrow icon in the announcement header. |
| Announcement Type | The following types of announcements can be chosen:
The below example screenshot shows the colors and icons for each type of announcement.
|
| Role | Select a role to filter the announcement:
|
| Time Zone | Choose a time zone for the announcement schedule. |
| Start Date | Choose a start date/time for the announcement schedule. Format: YYYY-MM-DD HH:MM:SS UTC Examples:
|
| End Date | Choose an end date/time for the announcement schedule. Format: YYYY-MM-DD HH:MM:SS UTC Examples:
|
| Deleteable | When enabled, the users can delete the announcement.
|
| Enabled | Enable or disable the announcement.
|