What is Skills Based Routing:
The goal of Skill Based Routing is to align the optimal agent with the assigned interaction Demand(s). If there are no Ready agents, the Skills Based routing logic can be configured to:
- Wait for the most skilled agent to become Ready.
- Expand the pool of eligible agents by “relaxing” the Demand Filter requirements to offer the interaction to lesser-skilled agents.
Enabling Skills Based Routing:
To enable Skills Based routing first modify the Business Process Routing Strategy to “Skill Base”. Once activated, the following settings become required:
- At least one Demand Filter must be configured within the Business Process > General tab.
- Each Queue activity must be assigned one or more Demand Filter(s) and its associated Search Period.
Demand Filter Setup:
Demand Filters are the foundation for Skills Based routing. These filters contain the Demand groupings along with proficiency levels (High, Medium, or Low) which determine agent eligibility.
These can be simple (a single Demand and proficiency) or advanced (multiple Demand groupings and proficiency levels).
To setup a Demand Filter, navigate to the Business Process > General tab and select the “New” icon within the lower left section labeled “Demand Filters”.
In the image below there are 3 demand filters (High, Medium, and Low). Each demand filter has one active demand (Evolve IP) in 3 separate proficiencies (High, Medium, and Low).
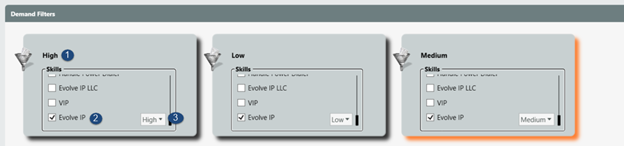
- Demand Filter name
- Demand
- Proficiency Level
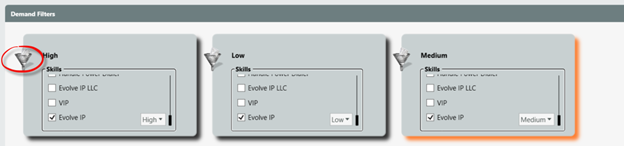
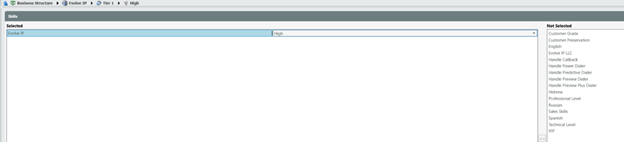
The funnel icon on Demand Filters enables a wider Demand/Proficiency management view. This view is recommended when a Demand Filter contains more than one Demand.
Once Demand Filters are configured, each Queue activity within the Business Process > Interaction Handling Flow requires the Demand Filter Activation Timing configuration.
Queue activity Setup:
Selecting the Queue activity icon (when Skill Based routing is enabled) presents configuration for Demand Filter Activation Timing. This setting is located in the top right corner of the Queue activity configuration.

To add a new Demand Filter:
- Select the “New” icon.
- Select a configured Demand Filter from the drop-down list.
- Provide a configured Search Period.
The Demand Filter and Search Period combination dictate the required agent skills and proficiencies to be eligible for an interaction.
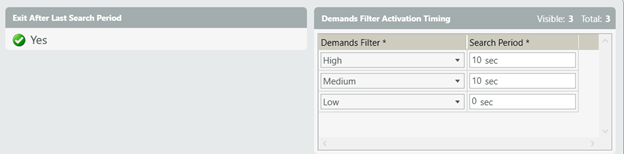
In the below example, interactions arriving to the Tier 1 Business Process with an “Evolve IP” demand will:
- Activate the first Demand Filter (High) thus waiting 10 seconds for an agent skilled High in the “Evolve IP” Demand. During this time the interaction will not be delivered to an “Evolve IP” Medium or Low skilled agent.
- After 10 seconds the Demand Filter (Medium) will activate, reducing the interaction requirement to include a search for Medium skilled agents in a Ready state. This will occur for an additional 10 seconds.
- After a total of 20 seconds (the combined duration of the High and Medium Demand Filters), the third and final Demand Filter (Low) will activate. This will further reduce the requirement by now considering any “Evolve IP” skilled agent (High, Medium or Low) for this interaction.

Key Information:
- A value of “0” in any configured Search Period will be treated as 1 second.
- Demand Filters work in a sequential manner and do not cycle back to the starting Demand Filter.
- Supervisors can also monitor the current active Demand Filter by navigating to the Business Process > Current Interactions tab.
- When Exit After Last Search Period is disabled the interaction will remain in Queue until Answered, Abandoned or Overflowed.
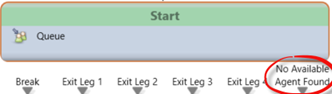
Enabling Exit After Last Search Period
- After an interaction progresses through the Demand Filter(s) and isn’t answered by a Ready Agent, it will exit the queue when Exit After Last Search Period is enabled.
- In the below example, once an interaction has been in queue for 21 seconds it will exit out the Queue’s “No Available Agent Found” output leg.

- The only caveat is when an interaction is actively offering to an agent. The interaction will exit via the Queue “No Available Agent Found” once offering has stopped and time in queue exceeds the values configured as Search Periods. The offering state duration is dictated by the configured “Agent console no answer time”.
- In the below example, an interaction could wait a maximum of 50 seconds (“Agent console no answer time” plus maximum queue time before exit) since the interaction must finish offering before being able to exit via the queue’s “No Available Agent Found” output leg.

When an interaction exits out the queue “No Available Agent Found” output leg it will be considered “Overflowed”.