In This Article
Overview
This article covers the steps to add, change, or remove an Emergency Address for your organization, and to define Dispatchable Locations by associating an Emergency Address with network items (Subnets, WAPs, Switches and Switch Ports).
NOTE
Full planning and prerequisite details can be found in the Emergency Calling - Overview and Planning article.
Add a Civic Address
IMPORTANT
Once a Civic Address is validated, it cannot be changed. If a Civic Address has already been validated, and it needs to be changed, you must delete the Civic Address, and create a new one.
NOTE
We recommend you create Civic Addresses in the Teams Admin Center (TAC), and then, if you have a lot of Places to associate with a Civic Address, use PowerShell.
Teams Admin Center
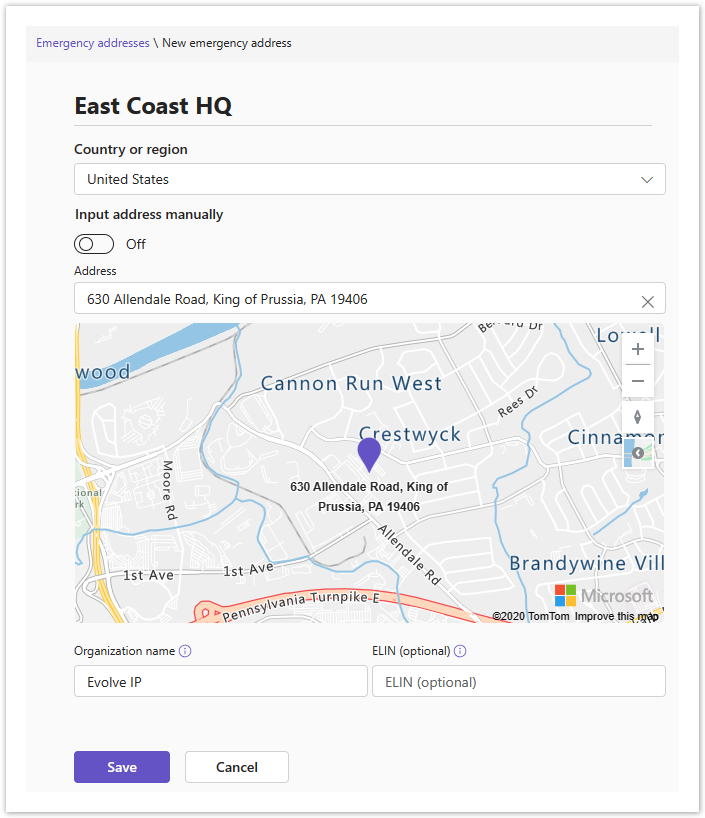
In the Teams admin center, browse to: Locations > Emergency Addresses
- Click Add
- Enter a Name for the address
- The Name becomes the address Description
- The Name is NOT passed to emergency responders
- Use the Name field to describe the building for employees & administrators
- Use the vernacular known to employees & administrators. Ex: East Coast HQ
- From the drop-down menu, select a Country or Region
- Enter the Address
- If the address isn't found and you want to manually edit the address, turn on Input address manually
- Change the Organization Name
- The Organization Name is passed to emergency responders
- Enter your organization's name as it appears on the building
- After your organization's name, enter the name of the building (if applicable). Ex: Evolve IP - Building A
- Enter an ELIN (optional)
- Click Save
PowerShell
When adding a civic address using PowerShell a Geo-Location (Latitude/Longitude coordinates) is not automatically added. You have to manually include the latitude/longitude coordinates in your PowerShell command. We recommend you define a Civic Address by using the Address Map Search feature in the Teams Admin Center (TAC).
PowerShell Command Reference
- Get-CsOnlineLisCivicAddress
- New-CsOnlineLisCivicAddress
- Set-CsOnlineLisCivicAddress
- Remove-CsOnlineLisCivicAddress
PowerShell Example for Adding a New Civic Address
NOTE
The below PowerShell code does not include all of the parameters that can be used to define a Civic Address. Refer to Microsoft's New-CsOnlineLisCivicAddress page for more parameters.
The Description parameter:
- The Description is NOT passed to emergency responders
- The Description is used to describe the building for employees & administrators
- Use the vernacular known to employees & administrators. Ex: East Coast HQ
The CompanyName parameter:
- The CompanyName is passed to emergency responders
- Enter your organization's name as it appears on the building, or in the building lobby
- After your organization's name, enter the name of the building (if applicable). Ex: Evolve IP - Building A
# Define the Civic Address Properties
$CivicAddrProperties = @{

	Description		= "East Coast HQ"
	CompanyName 	= "Evolve IP"
	HouseNumber		= 630
	StreetName 		= "Allendale Road"
	City			= "King of Prussia"
	StateOrProvince = "PA"
	PostalCode		= 19406
	CountryOrRegion = "US"
	Latitude        = 40.10158
	Longitude       = -75.39473
}

# Create the new Civic Address
New-CsOnlineLisCivicAddress @CivicAddrProperties

# Confirm the new Civic Address using a Where-Object condition
Get-CsOnlineLisCivicAddress | Where { $_.Description -eq "$($CivicAddrProperties.Description)" }

# Or confirm the new Civic Address using the City property
Get-CsOnlineLisCivicAddress -City "$($CivicAddrProperties.City)"
Bulk Add with PowerShell
When adding a civic address using PowerShell a Geo-Location (Latitude/Longitude coordinates) is not automatically added. You have to manually include the latitude/longitude coordinates in your PowerShell. We recommend you define a Civic Address by using the Address Map Search feature in the Teams Admin Center (TAC).
Bulk adding one or more Civic Addresses requires a CSV file with the following Headers (Column Names):
- Description
- CompanyName
- HouseNumber
- StreetName
- City
- StateOrProvince
- PostalCode
- CountryOrRegion
- Latitude
- Longitude
NOTE
The above list does not include all of the parameters that can be used to define a Civic Address. Refer to Microsoft's New-CsOnlineLisCivicAddress page for more parameters.
The Description parameter:
- The Description is NOT passed to emergency responders
- The Description is used to describe the building for employees & administrators
- Use the vernacular known to employees & administrators. Ex: East Coast HQ
The CompanyName parameter:
- The CompanyName is passed to emergency responders
- Enter your organization's name as it appears on the building, or in the building lobby
- After your organization's name, enter the name of the building (if applicable). Ex: Evolve IP - Building A
PowerShell Example for Bulk Adding Civic Addresses
# Import the CSV file into a variable
$CivicAddresses = Import-Csv -Path "C:\Path\to\Csvfile.csv"

# For each Civic Address (CA), create a new Civic Address
ForEach ($CA in $CivicAddresses) {

	# Define the Civic Address Properties
	$CivicAddrProperties = @{

		Description		= "$($CA.Description)"
	    CompanyName 	= "$($CA.CompanyName)"
		HouseNumber		= $CA.HouseNumber
		StreetName 		= "$($CA.StreetName)"
		City			= "$($CA.City)"
		StateOrProvince = "$($CA.StateOrProvince)"
		PostalCode		= $CA.PostalCode
		CountryOrRegion = "$($CA.CountryOrRegion)"
		Latitude        = $CA.Latitude
		Longitude       = $CA.Longitude
	}

	# Create the new Civic Address
	New-CsOnlineLisCivicAddress @CivicAddrProperties
}
Add a Place to a Civic Address
For each Civic Address, you can optionally add Places for buildings, floors, and offices to create a more specific Emergency Address. For small buildings or offices, a Place may not be required.
NOTE
If you have a large number of Places to add to your Civic Address(es), we recommend using PowerShell instead of the Teams Admin Center (TAC).
Teams Admin Center
- In the Teams admin center, browse to: Locations > Emergency addresses
- In the list of emergency addresses, click the Description (Name) of the address for which you want to add a place
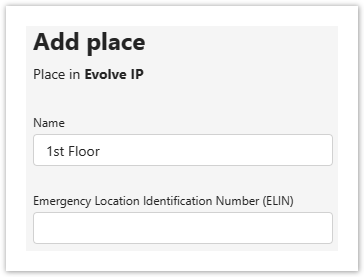
- On the Places tab, click Add
- In the Name filed, enter the information
- Enter an ELIN (optional)
- Click Apply
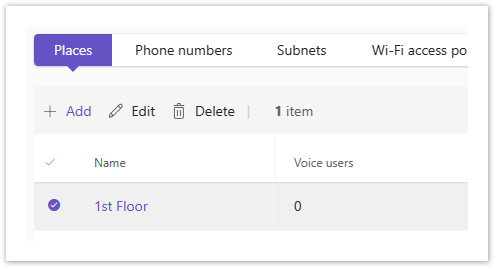
Here's an example screenshot of the above Place added to the Civic Address.
PowerShell
When using PowerShell a Place is called a Location.
PowerShell Command Reference
PowerShell Example for Adding a New Place (Location)
# Get the ID (Guid) for the Civic Address
Get-CsOnlineLisCivicAddress | FT CivicAddressId,Description

# Add the new place (location) to the Civic Address
New-CsOnlineLisLocation -CivicAddressId <CivicAddressId> -Location "1st Floor"

# Get the Location ID (Guid) for all Places (Locations) associated with a Civic Address
Get-CsOnlineLisLocation -CivicAddressId <CivicAddressId> | FT CivicAddressId,LocationId,Location
NOTE
The output of the Get-CsOnlineLisLocation command may include an empty Location. If so, this represents the initial Place (Location) created when the Civic Address was created. This empty Place (Location) can be ignored, or you can set a Place (Location).
Set-CsOnlineLisLocation -LocationId <LocationId> -Location "1st Floor"
Bulk Add with PowerShell
Bulk adding one or more Places (Locations) requires a CSV file with the following Headers (Column Names):
- CivicAddressId
- Location
PowerShell Example for Bulk Adding Places (Locations)
# Import the CSV file into a variable
$Places = Import-Csv -Path "C:\Path\to\Csvfile.csv"

# For each Location in Places, create a new Location for the defined Civic Address ID
ForEach ($Location in $Places) {

	New-CsOnlineLisLocation -CivicAddressId $Location.CivicAddressId -Location "$($Location.Location)"
}
Associate Networking to an Emergency Address
Adding network elements to an Emergency Address creates a dispatchable location for emergency services. Subnets are required. Wireless Access Points (WAPs), Switches, and Switch Ports are optional.
NOTE
To create a dispatchable location for emergency services, an Emergency Address must have one or more subnets associated with it. You can also assign WAPs, Switches, and Switch Ports to an Emergency Address to further pinpoint a dispatchable location in a building.
Teams Admin Center
In the Teams admin center, browse to: Locations > Networks & Locations
Subnets (tab)
- Click Add, and in the fly-out window, enter the following:
- IP Version: IPv4 or IPv6
- IP Address
- Description
- Choose an Emergency Location to associate with the subnet
- Search by City
- Search by the Location Description
- Click Apply
Wi-Fi Access Points (tab)
- Click Add, and in the fly-out window, enter the following:
- BSSID (the BSSID must be separated with hyphens)
- Description
- Choose an Emergency Location to associate with the subnet
- Search by City
- Search by the Location Description
- Click Apply
Switches (tab)
- Click Add, and in the fly-out window, enter the following:
- Chassis ID
- Description
- Choose an Emergency Location to associate with the subnet
- Search by City
- Search by the Location Description
- Click Apply
Ports (tab)
- Click Add, and in the fly-out window, enter the following:
- Port
- Chassis ID
- Description
- Choose an Emergency Location to associate with the subnet
- Search by City
- Search by the Location Description
- Click Apply
Bulk Import with the Teams Admin Center
You can use the Teams Admin Center to bulk import the associations between Emergency Addresses and Network Elements.
- In the Teams admin center, browse to: Locations > Networks & Locations
- Click Upload to open the fly-out panel, and then download the CSV template files, which are in a Zip archive.
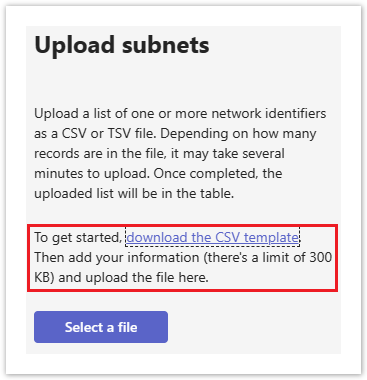
There are 4 template CSV files with example data you can use to bulk import your networking information.
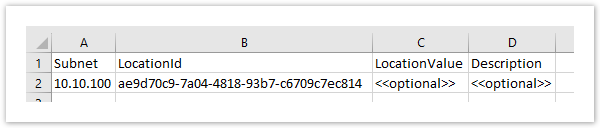
Subnets.csv
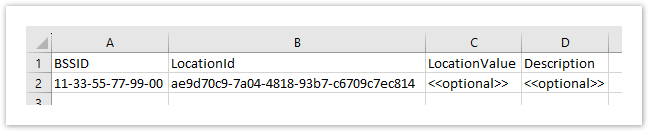
WifiAccessPoints.csv
Switches.csv

Ports.csv

NOTE
The required LocationId field in the CSV files represents the unique value given to an Emergency Address (Civic Address & Place). To export a list of Location IDs into a CSV file, connect to Microsoft Teams with PowerShell, and use one of the below PowerShell commands.
# Export all LIS Location data
Get-CsOnlineLisLocation | Export-Csv -Path "C:\Path\to\CsvFile.csv" -nti

# Export selected properties
Get-CsOnlineLisLocation | Select CivicAddressId,LocationId,Description,Location | Export-Csv -Path "C:\Path\to\CsvFile.csv" -nti
PowerShell
When associating an Emergency Address with a network element, the Location ID for the Emergency Address (Civic Address and Place) is required.
# Get all LIS Location data for all Emergency Addresses (Civic Addresses & Places)
$LisLocations = Get-CsOnlineLisLocation

# View the data
$LisLocations | FT CivicAddressId,LocationId,Description,Location

# Export the data to a CSV file
$LisLocations | Export-Csv -Path "C:\Path\to\CsvFile.csv" -nti
PowerShell Command Reference
- Get, Set, Remove -CsOnlineLisSubnet
- Get, Set, Remove -CsOnlineLisPort
- Get, Set, Remove -CsOnlineLisWirelessAccessPoint
- Get, Set, Remove -CsOnlineLisSwitch
NOTE
There are no New-CsOnlineLis PowerShell commands. Instead, you use the Set-CsOnlineLis command. If there's no record with the network element and a Location ID, a new record will be created. If a record exists, the record will be overwritten.
PowerShell to Assign a Subnet (Required)
# Variables
$Subnet      = '10.10.10.0'
$LocationId  = "edcf4020-7a7c-11ee-ba6c-e5d6f6964ecf"
$Description = "1st Floor"

Set-CsOnlineLisSubnet -LocationId $LocationId -Subnet $Subnet -Description $Description
PowerShell to Assign a Wireless Access Point (Optional)
The BSSID must be separated with hyphens.
# Variables
$BssId       = 'F0-6E-0B-C2-03-23'
$LocationId  = "edcf4020-7a7c-11ee-ba6c-e5d6f6964ecf"
$Description = "1st Floor, Engineering"

Set-CsOnlineLisWirelessAccessPoint -LocationId $LocationId -BssId $BssId -Description $Description
PowerShell to Assign a Switch (Optional)
# Variables
$ChassisId   = 'B8-BE-BF-4A-A3-00'
$LocationId  = "edcf4020-7a7c-11ee-ba6c-e5d6f6964ecf"
$Description = "2nd Floor, Rack A-1"

Set-CsOnlineLisSwitch -LocationId $LocationId -ChassisId $ChassisId -Description $Description
PowerShell to Assign a Switch Port (Optional)
# Variables
$ChassisId   = '0B-23-CD-16-AA-CC'
$PortId      = '03'
$LocationId  = "edcf4020-7a7c-11ee-ba6c-e5d6f6964ecf"
$Description = "3rd Floor, Rack B-2; Serves Rm 303"

Set-CsOnlineLisPort -LocationId $LocationId -ChassisId $ChassisId -PortId $PortId -Description $Description
Bulk Associate with PowerShell
Bulk associating one or more network elements requires a CSV file with the following Headers (Column Names):
- LocationId
- Subnet
- SubnetDescription
- BssId
- BssIdDescription
- ChassisId
- ChassisIdDescription
- PortId
- PortIdDescription
NOTE
- Each row in the CSV file must have a LocationID and Subnet.
- If the fields for the other network items are left blank, an association with the LocationID will not be created.
- The description fields are optional, but recommended.
- When associating switch ports, the switch chassis ID is required.
- The BSSID must be separated with hyphens.
PowerShell Example for Bulk Associating Network Elements to Emergency Addresses with CSV File
# Import the CSV file into a variable
$NetorkItems = Import-Csv -Path "C:\Path\to\Csvfile.csv"

# For each network element, associate the location ID
ForEach ($Item in $NetworkItems) {

	# Associate a subnet
	If ($Item.Subnet) { Set-CsOnlineLisSubnet -LocationId $Item.LocationId -Subnet $Item.Subnet -Description $Item.SubnetDescription -Force }

	# Associate a WAP BSSID
	If ($Item.BssId -and $Item.BssId -like "*-*") { Set-CsOnlineLisWirelessAccessPoint -LocationId $Item.LocationId -BSSID $Item.BssId -Description $Item.BssIdDescription -Force }

	# Associate a Switch & Switch Port, or just a Switch
	If ($Item.PortId -and $Item.ChassisId) { Set-CsOnlineLisPort -LocationId $Item.LocationId -ChassisId $Item.ChassisId -PortId $Item.PortId -Description $Item.PortIdDescription -Force }
	ElseIf ($Item.ChassisId) { Set-CsOnlineLisSwitch -LocationId $Item.LocationId -ChassisId $Item.ChassisId -Description $Item.ChassisIdDescription -Force }
	Else {}
}