In This Article
Overview
This article has the steps to connect Clearlogin to a Windows Active Directory domain controller (DC), and to configure delegated permissions for password changes and account unlocks.
The steps in this article require you to expose an Active Directory domain controller to the Internet. If you are syncing your local Windows AD to Azure AD you should consider connecting Clearlogin to Azure AD instead.
Identity Source Priorities
A primary use case for identity source priorities is having multiple connections to the same directory.
For example, you can configure Clearlogin with 2 identity sources (2 domain controllers) that are members of the same Active Directory forest. Just make the higher priority identity source a connection to your primary domain controller, and the lower priority identity source a connection to your secondary domain controller. This way Clearlogin has the ability to authenticate your users when the primary domain controller is not available.
Prerequisites
The following prerequisites need to be met before Clearlogin can be configured to connect to an Active Directory domain controller:
- For Clearlogin to be able to change a user account password, or reset an account's lockout status, it needs to connect to a writable domain controller. If Clearlogin will not be performing any of those tasks, it can connect to a read-only domain controller.
- The domain controller that Clearlogin connects to must have an SSL certificate to encrypt the communication between the domain controller and Clearlogin (LDAPS). The type of SSL cert can be any of the following:
- A public cert generated by a certificate authority (CA) like GoDaddy (highly recommended).
- A cert generated by your internal PKI environment like Active Directory Certificate Services (ADCS) (recommended).
- A self-signed cert generated for the domain controller (Not recommended. Consider this as a last resort).
- Note: Wildcard certs are supported.
- The domain controller needs to have a public IP address, and TCP Port 636 (LDAPS) open to receive connections from the Clearlogin public IP addresses:
54.209.59.53
54.84.156.93
54.210.149.165
54.187.95.53
54.187.96.193
- Create a service account in Active Directory for Clearlogin to use when querying user account properties and to verify a user account's password.
- Document the service account's DN (Distinguished Name) & Password
To get the service account's DN, do the following:
- Open Active Directory Users and Computers (ADUC)
- Make sure View (menu) > Advanced Features is selected. If not, select it.
- Open the properties of the Clearlogin service account and choose the Attribute Editor tab.
- Look for the distinguishedName attribute, and double-click it to view its value.
- Copy the value to the clipboard, and save it in a text file for later use.
- Click Cancel to get out of that window, and close the properties of the Clearlogin service account.
You can also use this PowerShell command: Get-ADUser <SAMAccountName>
Connect Clearlogin to a Domain Controller
- Sign into the Clearlogin Admin Console: https://admin.clearlogin.com
- In the left navigation bar, browse to: Identity Sources
- Click on New Identity Source, and select Active Directory
In the AD configuration page, fill in the following fields:
| Display Name | EXAMPLES
|
|---|---|
| User Domain | EXAMPLES
|
| Access Tag | < leave blank > |
| Priority | When you have multiple identity sources, this number tells Clearlogin which identity source to query first when a user signs in. If two or more identity sources have the same priority number, Clearlogin will query the identity source with the oldest creation date first and the newest creation date last. 1 (highest priority) - 10 (lowest priority) |
| Timeout | The amount of time Clearlogin will wait for a response from the identity source. 10 seconds (default) |
| Hostname | The FQDN or Public IP of your domain controller. |
| TCP Port |
|
| Encryption Type |
|
| Search Filter | Determines the Active Directory attribute Clearlogin will use when searching for user accounts. You can only have 1 search filter. EXAMPLES
|
| Search Base (for User Accounts) | Defines the location in Active Directory where Clearlogin starts its search for user accounts. The location must be defined as a DN (Distinguished Name). You can only have 1 search base. EXAMPLES
|
| Bind DN (Service Account DN) | This is the DN (Distinguished Name) of the Clearlogin service account. EXAMPLES
|
| Bind Password | This is the password for the Clearlogin service account. |
| Password Modification Operation | If password change/reset is enabled in Security > Passwords, this will tell Clearlogin how to perform password modifications. Reset | Change |
| Failover Protection Destination | This allows you to use Clearlogin's native directory as a backup for your AD user accounts. If you have an AD environment with multiple domain controllers and are also syncing your AD to Azure AD, you probably don't need to enable this feature. |
| Remove FQDN from Username | You can have Clearlogin remove the domain portion of a User Principal Name (UPN) or Email Address when a user signs in. For example, "user@domain.com" becomes "user". |
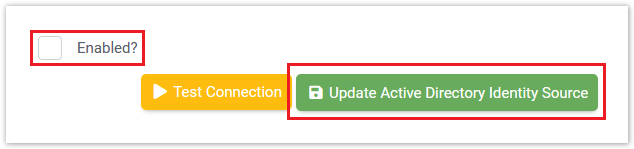
Click Update Active Directory Identity Source to save the configuration. 
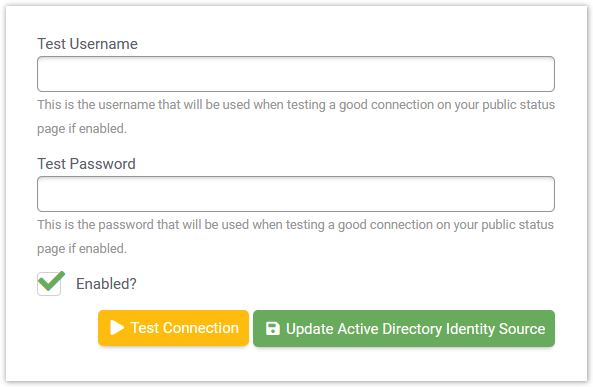
Test Connectivity
You can test the configuration with the test box at the bottom of the AD Identity Source edit page.
- Test Username: The samAccount name of a known user account.
- Test Password: The password of the Clearlogin service account.
AD Delegation for Password Changes & Unlocks
For Clearlogin to be able to change a user's password, or unlock a user account, you need to delegate permissions to the Clearlogin Active Directory bind/service account. You would only perform these steps to give Clearlogin the permissions to change a user's account password, or unlock a user's account.
Delegation Requirements
- Domain Admin permissions to set up the delegation
- The Clearlogin AD bind/service account
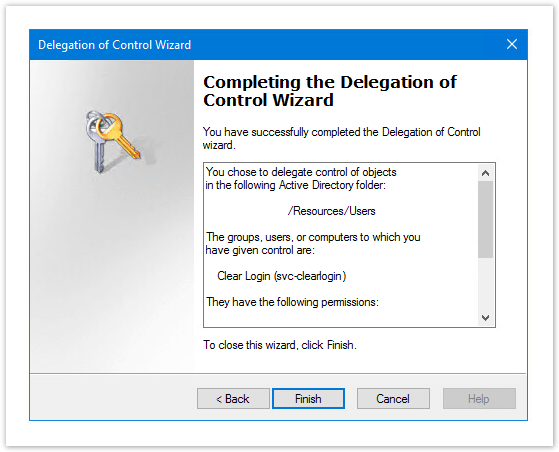
- The Organizational Unit (OU) that contains the user accounts that Clearlogin will manage
Steps to Configure Delegated Permissions
- Open Active Directory Users and Computers
- Right-Click the Organizational Unit (OU) that contains the user accounts that Clearlogin will manage, and choose Delegate Control...
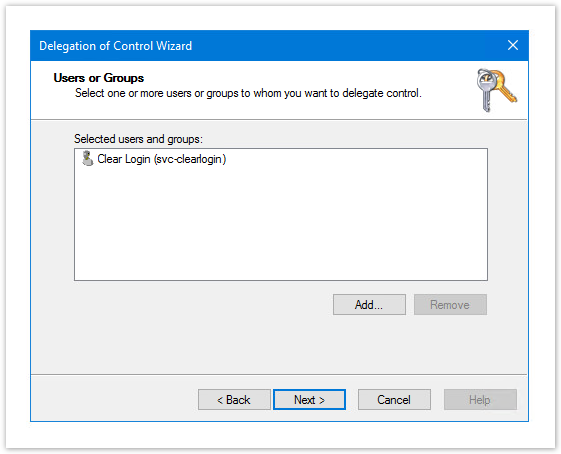
- Add the Clearlogin bind/service account, and click Next
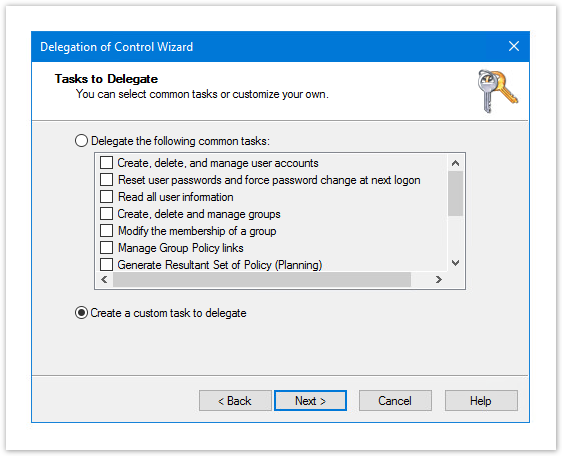
- Select Create a custom task to delegate, and click Next
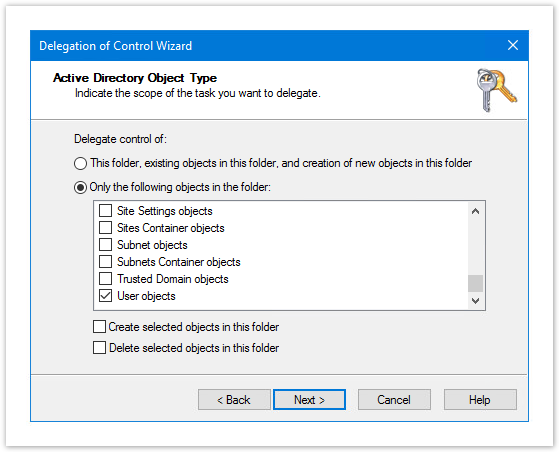
- Select Only the following objects in the folder
- From the list, scroll down and select User objects
- Click Next
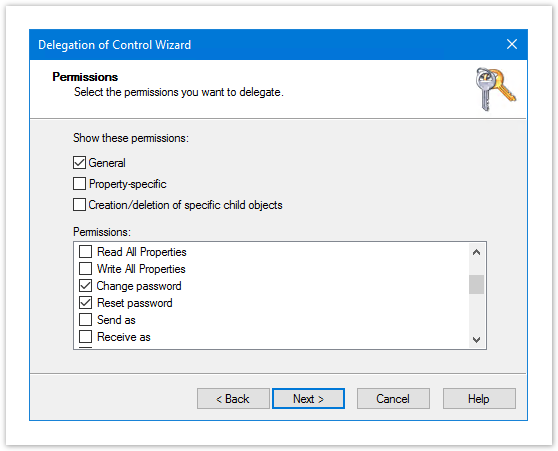
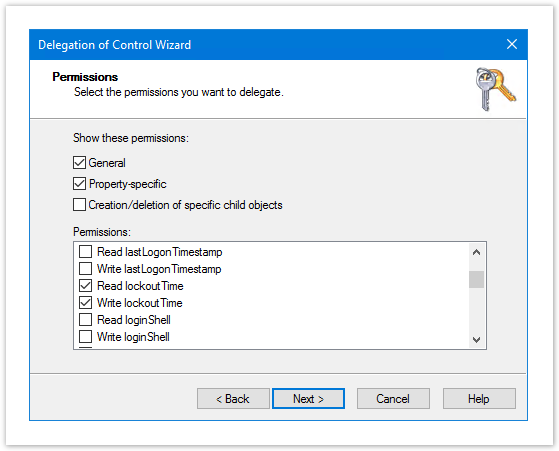
- Select General
- Scroll down and select Change Password & Reset Password
- Select Property-specific
- Scroll down and select Read lockoutTime & Write lockoutTime
- Click Next
- Review and click Finish
Remove Delegated Permissions
- Open Active Directory Users and Computers
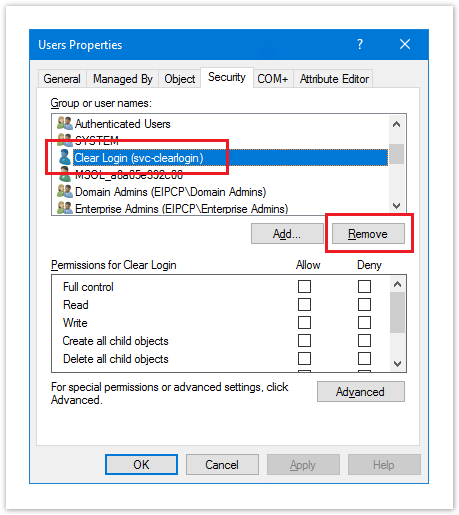
- Right-Click the Organizational Unit (OU) that contains the user accounts that Clearlogin manages, and choose Properties
- Select the Security tab
- Select the Clearlogin bind/service account
- Click the Remove button
- Click OK
Clearlogin Password Changes, Resets, & Lockouts
Depending on your requirements and how you have configured delegated permissions in AD, you may need to modify Clearlogin's Password & Lockout settings. To do so, follow the steps in the Password and Lockout Settings article.
Remove Active Directory from Clearlogin
You cannot recover from this process. When you delete this configuration, it cannot be restored.
- Log into the Admin Portal: https://admin.clearlogin.com
- In the left navigation bar, browse to: Identity Sources
- Click on the instance of Active Directory in your list of identity sources.
- Scroll to the bottom of the Summary page, and click Edit
- Scroll to the bottom of the Edit page, deselect Enabled, and click the Update button to save your changes.
You cannot recover from this process. When you delete this configuration, it cannot be restored.
- To delete the configuration, scroll to the bottom of the Summary page, and click Delete.
- The configuration is deleted immediately. You will NOT receive a warning.