In This Article
Overview
In this article you will be adding your unique Teams Direct Routing domains to your Office 365 tenant. These domain names are created and managed by Evolve IP. Additionally, you will be creating a new user account for each of the domains.
Your domains and user accounts will be similar to the following:
| Location | Domain | User Account UPN |
|---|---|---|
| Evolve IP East | c1005437.phl01.us.teams.evolveip.net | eip-tdr@c1005437.phl01.us.teams.evolveip.net |
| Evolve IP West | c1005437.las01.us.teams.evolveip.net | eip-tdr@c1005437.las01.us.teams.evolveip.net |
Adding a domain to your Office 365 tenant requires Global Administrator permissions.
Adding Your Domains
After Evolve IP has created your direct routing domain names, perform the following steps to add each domain to your Office 365 tenant:
Sign into your Microsoft 365 Admin Center with a user account that's a Global Administrator.
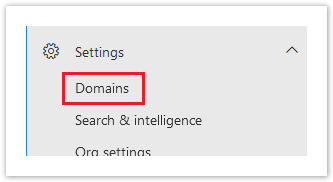
In the left navigation pane, browse to: Setup > Domains
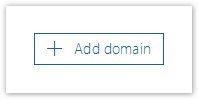
In the main window, click the + Add Domain button.
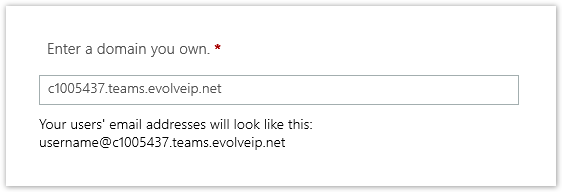
Enter your Direct Routing domain, and click Next.
Copy the TXT Value and take a screenshot of the information as shown below. The TXT Value needs to be added to your domain's DNS zone, which is done by Evolve IP.
Once the TXT value has been added to your DNS zone by Evolve IP, you can click the Verify button, which forces Microsoft to check for the DNS record.
If needed, click Save and Close to come back later.

- After verifying the domain, click Next.
- On the Update DNS Settings page, select I’ll add the DNS records myself and click Next.
- Clear all values, click Next, and then click Finish.
- Make sure the domain has a status of Setup Complete or Healthy.
Add the User Account
For each domain added to your Office 365 tenant, you need to create a user account using the domain, and temporarily assign it an Office 365 license that includes MS Teams (e.g. Office 365 E1).
- Sign into your Microsoft 365 Admin Center with a user account that at a minimum has the User Account Administrator role.
- In the left navigation pane, browse to: Users > Active Users
- Click the button to Add a User
| Item | Value |
|---|---|
| First Name | Evolve IP Teams |
| Last Name | Direct Routing - East |
| Display Name | Evolve IP Teams Direct Routing - East or Evolve IP Teams Direct Routing - West |
| Username (UPN) | eip-tdr @ your.direct.routing.domain.net [pick either the east (phl01) or west (las01) from the drop-down menu] |
| Password |
Note:
|
| Location | If needed set the location to the United States. |
| Licenses | Select an Office 365 license that includes MS Teams (e.g. Office 365 E1) |
| Roles | User (no administration access) |
| Profile Info | None, unless you have organizational requirements to add profile info. |
After creating the user account, you can set the password to never expire, but this is not a hard requirement:
- Open PowerShell as an Admin, and if needed, install the Azure AD module: Install-Module AzureAD
- Sign into Azure AD: Connect-AzureAD
- Run the following commands to set the user account's password policy. Make sure you edit the $UserUPN value to match the user account you just created.
$UserUPN = eip-tdr@your.direct.routing.domain.net
Set-AzureADUser -ObjectID $UserUPN -PasswordPolicies DisablePasswordExpiration
Verify the User Account
After creating the user account, wait 10-15 minutes and then sign into the Skype for Business Online service using PowerShell.
Run the below command to verify the user account is enabled for MS Teams:
Get-CsOnlineUser eip-tdr@your.direct.routing.domain.net | FL DisplayName, SipAddress, Enabled, TeamsUpgrade*
- A SIP Address should be present and include the domain.
- Enabled should equal True, which means the account is licensed for Teams.
- The Teams Upgrade Effective Mode should equal TeamsOnly
Example Output
If the Teams Upgrade Effective Mode is not set to TeamsOnly, run the following PowerShell command:
Grant-CsTeamsUpgradePolicy -Identity eip-tdr@your.direct.routing.domain.net -PolicyName UpgradeToTeams
Next Steps
We recommend that you wait about an hour before continuing to the next step. This allows Microsoft's back-end services to fully sync up with the new domains.